Author: rileylaurie

  • More on Modes

    To get the most from this article, please see my first post on Modes  (“Demystifying Modes”, published on this site on 5/30/2012),  in which I presented the basic concepts of modes in an easy-to-understand format.

    When a folk or traditional musician sits down with a group to play a tune, the usual question is, “What key is it in?” When someone asks this question, we sometimes find, upon starting to play, that it’s really not in the stated key; it may have a minor chord where a major would be, or a flat where a natural should be. This isn’t a trick on the newcomer; usually the person who told you doesn’t know their modes.

    Just because a tune uses a certain chord as its tonic doesn’t mean that’s the key. You might, for instance, begin and end on an A chord, when the actual key is G (that would be Dorian mode.) For those playing instruments with chromatic capability, this is not a big deal. That’s probably why many folks don’t realize that if there’s an anomaly (other than an occasional accidental) in the scale, it’s not a straight major or minor scale.

    For someone with a non-chromatic instrument, it can be more challenging when someone tells you they’re in a certain key that turns out to actually be a mode instead. A harpist may end up wildly flipping levers in the middle of a tune, or a pennywhistle player might have to switch whistles, and so on. Of course they discover the problem only after they’ve played a chord or note that should have been in the key they were given but which has turned out to be wrong. This makes the hapless victim look like a dunce.

    If using notation, the best way to determine the actual mode is to look at the ending melody note. If, for instance, the key signature indicates key of C and the ending note is C, then you’re in the key of C; but if you’re in the key of C but the ending note is D (the 2 note of the key of C) you’re in Dorian mode. If it’s G (the 5 note of the key of C), you’re in Mixolydian. And so on. (If the previous sentence made your brain freeze, my first article on modes explains how to easily determine each mode and how the modes can be played in any key.)

    Just for fun, let’s diverge a bit for a moment. Two common questions about modes are, “What do their names mean?” and “Where did they come from?” Ask any five people these questions and you’ll get five different answers; it seems there is no consensus. My friend Lorna Govier, a wonderful harpist and teacher living in Tucson, sent me some fascinating information to share with you:

    Modes have been defined and redefined many times throughout history in a rather convoluted way. This is one of the reasons the subject can be so confusing. The original mode names refer to Greek scales (not modes) which sound quite odd. Some of these names refer to the group of people who supposedly used them (i.e. “Phrygians” and “Lydians”); however, such assignments were probably wild guesses. There were also eight church modes (called “Gregorian modes”), which used the old Greek scale names but sounded quite different. And in 1547, Swiss theorist Henricus Glareanus added four more modes to make twelve. To make matters more confusing, the mode names were switched in the late 18th and 19th centuries, and it was decided to go back to only eight modes. But that didn’t stick either; now the modern system employs seven modes with Greek names that are different (again!) from the Gregorian modes. Interestingly, Akkadian texts (which predate Greek texts) define seven modes which are the same as the modern modes, but not with Greek names. And to confuse the matter a bit more, since the end of the eighteenth century, the term “mode” has also been applied to some non-European musical scales.

    When I Googled “Ancient Greek Modes”, everything I found was about the modes that are, given the above information, actually the modern ones, so apparently most folks are under the impression that the modern modes are ancient and Greek. (“Ancient” and “modern” may be relative terms, as we’ve been using these modes since the Middle Ages. But that’s more modern than ancient Greek culture.) But their designation as Greek is at least partially erroneous; even though they’ve been given Greek names, some of these modes were commonly used in Europe, and still are; that’s why I used Dorian and Mixolydian as examples above  –  they are very common, for instance, in Celtic music.

    So… back to the seven “modern” modes I’d been discussing:

    Each mode has a characteristic harmonic structure that gives it a distinctive sound. In my first article on modes I offered the easiest and most obvious way to understand them. For the left-brained among us, there are many ways of describing them, some more complex than others, though they all say the same thing in the end. Here’s a quote from Wikipedia: “The Ionian mode is the only mode whose dominant seventh chord type occurs naturally on the fifth scale degree, as V7…”

    No wonder so many folks run screaming when they hear the word “modes”. But for those who do want a little more detail as a next step from my first article, here’s a good way to understand what gives each mode its characteristic sound:

    First, there are four basic principles you have to know:

    1. The Do-Re-Mi scale consists of half steps and whole steps as follows: whole, whole, half, whole, whole, whole, half (1,1, ½, 1,1,1, ½.)  (Why, you might ask, is a scale not all whole steps? For now, suffice it to say that it would sound really weird if it were. In the future I’ll do an article on that. Right now, for the sake of staying on subject, just take my word for it.)

    2. There are no sharps or flats in any of the seven modes when you’re in the Key of C, and when in other keys, no sharps or flats are added to the existing ones to create any mode. All the modes contain only the notes in the diatonic scale  –  no more and no less.

    3. Each mode simply starts in a different position.

    4. When you start a scale on a note other than the tonic (note 1) of the key, the positions of the half steps are automatically shifted because you’ve started on a note other than 1.

    Now let’s look at each mode:

    The Ionian or “1” mode is the normal scale that we call “diatonic” or “major”. It goes from the tonic (1) note (of any key) up seven successive notes plus one more to its octave, or, to put it very simply, from 1 to 8 (in the key of C it is: C,D,E,F,G,A,B,C). As described in the previous paragraph, the half steps in this scale are between notes 3 and 4 and between notes 7 and 8.  Therefore the positions of whole steps and half steps in Ionian are: 1,1, ½, 1,1,1, ½

    The Dorian, or “2” mode goes from the second note (2) up to its octave (from 2 to 2). Therefore, the half steps are automatically shifted down one position, thusly: whole, half, whole, whole, whole, half, whole (1, ½, 1,1,1, ½, 1).

    The Phrygian, or “3” mode, starts one note higher than the Dorian, going from the third note (3) up to its octave, or from 3 to 3. Therefore, the half steps automatically shift down one more position, thusly: ½, 1,1,1, ½, 1, 1.

    …and so on with each mode:

    Lydian (4 mode):  1,1,1, ½, 1, 1, ½

    Mixolydian  (5 mode):  1,1, ½, 1, 1, ½, 1

    Aeolean ( 6 mode):  1, ½, 1, 1, ½, 1,1

    Locrian  (7 mode):  ½, 1, 1, ½, 1,1,1

    I suppose the big question is, “So what?” For those who are simply playing tunes learned because we like them, whether by ear of from notation, you may never be affected by the fact that some of the tunes are in one mode or another. You can just play them without ever having to think about that. But for those who compose music, understanding modes can help you in creating specific moods in your music. And for those studying with a therapeutic music training program, understanding modes may be part of your training, as each mode’s characteristic “feel” can affect listeners’ emotions (and, some say, their physical state as well), so knowing how to use modes is considered important. And for all of us, understanding why a piece sounds as it does (“Oh, it’s eerie because it’s in Locrian mode!”) is just plain interesting.

    One more thing to know: if you hear someone say “D Dorian”, it means Dorian starting from D, not Dorian in the key of D.  D Dorian is in the key of C; it starts on the 2 note (D) of the C scale. Likewise, D Mixolydian would start on the D (5) note of the G scale. The best way to figure what key a mode is in when someone says something like, “We’re in D Mixolydian”, is to know your mode numbers. For instance, Mixolydian is the 5 mode. So if someone says “D Mixolydian”, count down five notes from and including D – that would be D, C, B, A, G – and you arrive on G, which is the key.

    By the way, some will argue that a mode is not a scale. Any grouping of successive notes can be called a scale (for example, a “pentatonic scale” is only five notes, but it’s still a scale). Wikipedia says a scale is “a series of notes differing in pitch according to a specific scheme…” I would add that the notes are in an ascending order (a scale doesn’t change directions).

    If all this has made your eyes glaze over, don’t worry about it. What I wrote in my first article on modes will get you started.

    Don’t think you can’t play music if you’re not up on your modes. Knowing your modes and other theory makes us better musicians, but we all have a right to play for fun and entertainment.

    Next week: Practicing Effectively
  • More About Hands: Technique Issues

    (To get the most from this post, please also read last week’s post.)

    For those who play an acoustic stringed instrument, the term “technique” refers to the way we use our hands to play. Good technique produces the melding of four elements:

    1. optimal relaxation of the hands through good ergonomics of the hands and arms
    2. optimal tone
    3. optimal accuracy
    4. optimal smoothness, speed, and expression

    For each type of instrument, there is no single technique that works for everyone, because each person’s hands are different. Your fingers may be longer or shorter than average; your thumb may be a different length than someone else’s, and the thumbnail may oriented at a different angle to the hand. The palm of your hand may be narrow or wide. Your knuckles might collapse, bend both ways, or whatever. Individual differences are endless. Strangely, these differences often aren’t considered.

    If someone has had to work hard on their technique, they’ll have an investment in its being the “only right one”. There would be many more excellent musicians in the world if more teachers individualized technique for each student’s needs. That said, there are students who don’t learn what they’re taught. The relationship between student and teacher is not 50-50; it’s 100-100. Both have to give it 100% in order for learning to be successful.

    Individualizing technique doesn’t mean re-inventing a new method for each student; it simply means being well versed in all the accepted methods and being able to identify which one is best suited, and then tweaking it if necessary.

    Some folk musicians are self-taught and have no technical training. Some get pretty good at what they do, but think of this: if they had technical training as well, they’d be even better. Why not be the best you can be?

    When you seek a teacher, check out their reputation. Beware of the minimally qualified; lack of technique will limit your skill development, and once you form poor habits, it’s hard to break them. On the other hand, you can learn from more than one teacher; each will have something of value to offer. Learning more than one technique will not ruin what you already know. (If you had a vocabulary of 1000 words, would learning another 1000 words make you forget the first 1000? Of course not.)

    Let’s look at the three elements I listed in the first paragraph:

    1. Ergonomics of the hands and arms can be described as having two elements:
    2. Most new hand positions and motions don’t feel natural at first, but should become comfortable after a few weeks. There should be no tension in the hands, and no discomfort. Relaxed playing produces smoothness and flow in the music.
    3. When you’ve learned to relax the hands and have comfortable ergonomic hand position and movements, you’ll automatically begin to develop kinesthetics (memorizing the feeling of distances and intervals of placements of note groupings, phrases and chords, and developing muscle memory). This allows you to play without having to think consciously about every note. (We can’t rely on the conscious mind to stay on top of every note we play; we must have muscle memory. Without it, music sounds choppy and halting.)


    2. Tone also has two elements:

    a. quality of sound and volume.

    b. dynamic expression (loud and soft). Consider how much you paid for your instrument. If you have, say, a $2000 instrument, and you are only getting a $200 sound out of it, you need to learn a better technique.


    3. Accuracy has three elements:

    a. Minimal mistakes (If, no matter how much you practice, you still make too many mistakes, the good news is that you are not inept, only that your technique needs help.)

    b. Clarity  – every note is audible (without skips, flubs or plunks); what’s in your head actually comes out your fingers.

    c. Your eyes are free so you don’t have to watch your fingers play, and can therefore rely on kinesthetics.


    4. Smoothness, speed and expression are outgrowths of all of the above factors.


    (Sorry about the formatting above; WordPress has a mind of its own.)

    Because technique should be individualized, how will you know if the technique you’ve been taught is a good one for you? The answer lies in results. Give a good, honest try to the technique you’re taught, without resisting or changing what you’re asked to do. If after a few months you are not progressing, then it’s not the best technique for you. It’s more likely, though, that you’ll find your playing has improved. One good way to measure your progress is to record yourself playing before you start learning the new technique, and then again after two months of focused practice, and compare the new recording with the old. You may be amazed!

    I like to encourage all musicians to keep learning, even after you think you’ve “arrived”. People often ask me how long it will take to learn to play a certain instrument. The truth is, it may take only a few months to learn the basics, but after that, progress is life-long.  The best musicians know there is no end to progress; no matter how good you get, there’s always further to go, and that’s why playing an instrument is so fulfilling.


    Next week: More about Modes


  • All About Hands (part 4 of the Discomfort and injury series)

    To get the most out of the following information, reading the three previous posts will give you the background information on this subject.

    The information here is not a substitute for medical diagnosis and treatment.

    ***

     Musicans’ hand discomfort or injury most often develops from holding the hands stiffly or awkwardly while plucking or pressing the strings or keys of an instrument. This can affect the muscles, tendons, tendon sheaths, joints, nerves and nerve sheaths of your hands, fingers and wrists.

     Although these are often referred to as “repetitive motion injuries”, repetitive motion alone isn’t necessarily a problem, but repetitive motion under stress causes many injuries. “Stress” means any stiffness or tension of the muscles being used.

    Many people think their hands are not agile when in fact they are just using them badly. You may not necessarily be aware when your hand is tense or your position is awkward. If you can’t feel it, you can probably hear it; tension in the hand makes the music sound tense and choppy.

    To feel the difference between relaxed repetitive motion and stressed repetitive motion, try this experiment:

    1. Away from your instrument, hold your hand parallel to the floor, palm down.

    2. Let your fingers relax completely.

    3. In this relaxed position, wiggle your fingers. This should feel very easy.

    4. Next, bend the wrist so the hand is up as though you were stopping traffic, and wiggle the fingers again. Notice how they move reluctantly at best. One cannot expect to play well with the wrist bent in that direction.

    5. Now, splay the fingers (fan them out as far as you can) and wiggle the fingers again. Stiff, eh?

    Splaying the fingers or bending the wrist (in the direction described) requires significant flexion of muscles and related tendons, and this can potentially cause injury when in combination with the repetitive motion required to play an instrument. (There are also other ways one might tense the hand muscles, such as clenching the fist, but the above are mentioned because they are the most common for musicians.)

    When we move our fingers, the tendons and muscles responsible are not just in the fingers. Finger movement is governed by tendons that begin at the fin­gers but extend through the hand and wrist, and attach to corresponding muscles in the forearm; therefore, finger movement actually orig­inates in the forearm. There is one muscle for each finger on the outer side of the forearm, and another on the inside of the forearm. The ones on the outer side are responsible for upward finger movement and for opening the fingers, while the muscles on the inside of the forearm are responsible for inward finger movement and closing the fingers. Therefore we have to be careful with our arms as well as our hands. (See the arm illustration in my post of 6/27.)

    By the way, wrist bones (carpals) have small spaces between them that close when you bend the wrist back. But when you straighten the wrist, those bones are more separated. Playing with a straight wrist creates less friction between the carpal bones.

    Now try this:

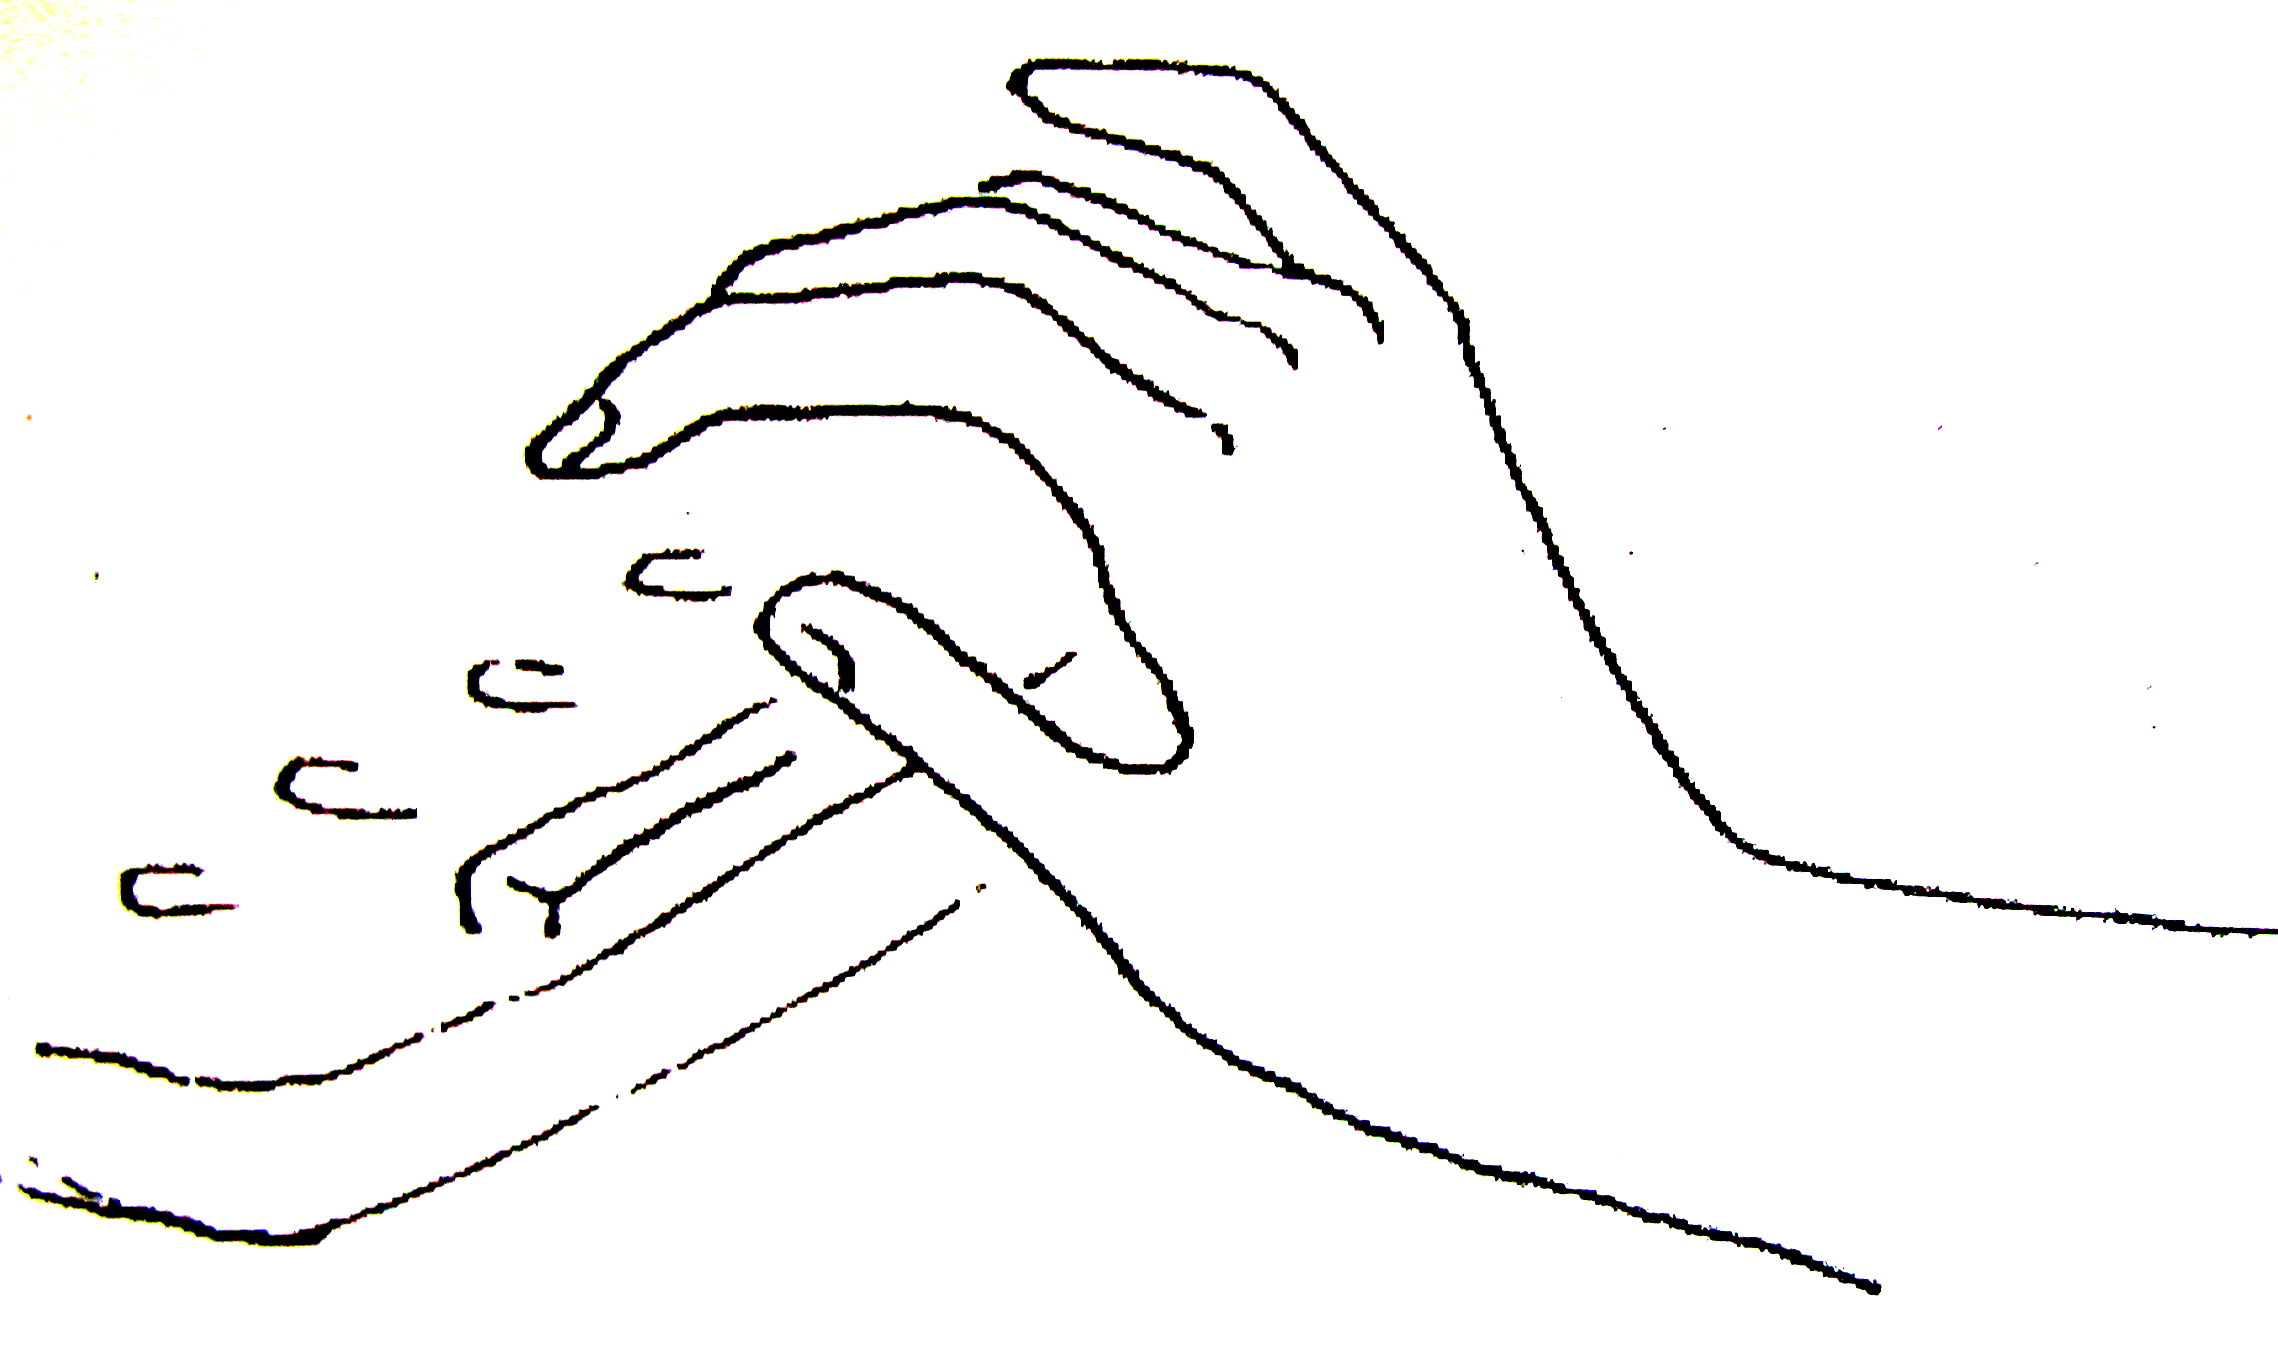
    1. Hold your arm out with the wrist straight and the palm facing the floor. Let the fingers curl natu­rally. Now lift the curled index finger. Note how the associated ten­don becomes prominent on the back of your hand. (Every time you lift a finger, you tense a tendon).
    2. Move the curled index finger into the palm of the hand. Notice how little the tendon moves by comparison. Into the palm is a relaxed plucking motion. Yet many string musicians pluck by lifting the fingers instead, which is awkward and tense.

    Be aware of what you do with your hands in your everyday activities, too. If you use tools or work with your hands in any way, be careful about repetitive motion under stress. Typists, for instance, have a high rate of Carpal Tunnel Syndrome. Carpenters and gardeners are prone to tendonitis. If you talk on the phone for more than about 30 minutes a day, holding the phone to your ear can eventually injure the hand or wrist. (No kidding. Your neck can develop problems, too. Get a headset for your phone, or use the speaker function, to free your hands.)

    Another factor in keeping your hands and wrists healthy: how do you hold your hands when they are not in use? Do you drum your fingers on tables or other surfaces, do you fidget, or do you clench your fists? Those subconscious habits can be noticed and changed.

    What are the specific causes and symptoms of each of the common repetitive-motion-under-stress-injuries: Carpal Tunnel Syndrome, Tendonitis, Focal Dystonia and Tenosynovitis?

    Carpal Tunnel Syndrome is a term that has been over-used and over-diagnosed. It’s a common injury, but be aware that there are other injuries that can produce similar symptoms, and which need to be treated differently.

    Carpal Tunnel Syndrome occurs when the median nerve is entrapped where it goes through the wrist area, by inflammation (swelling) of its sheath or by a buildup of mucopolysaccharides (fatty deposits which can occur even if you’re not overweight) inside the sheath. One of the symptoms of carpal tunnel syndrome is sharp pain that shoots up the arm, which is often worse at night.

    Tendonitis is an inflamed tendon. It can be exacerbated by excess mu­copolysaccharides in the lubricating fluid (synovial fluid) around the tendon. Its symptoms include pain when the tendon is used, and sometimes swelling and/or redness in the affected area.

    Tenosynovitis in musicians usually manifests as stiffness of one or more fingers and inability to open the finger once you’ve closed it. This is due to inflammation within the tendon sheath that prevents the tendon from moving smoothly (or at all). There may also be a popping sound when you flex your fingers.

    Focal Dystonia is a mysterious condition that manifests much like tenosynovitis, but often without pain. One or more fingers may clench and not open. It is more often found in professional musicians who play for many hours a day over several years. Research has hinted that it’s a neurologic problem rather than an injury per se, but it isn’t yet fully known why the message from brain to finger gets scrambled. For the musician, this is especially strange considering that they’ve so carefully trained their brain-to-muscle impulses to be accurate and reliable, and in fact they were perfectly fine for many years of playing.

    Thoracic Outlet Syndrome (TOS) is a condition that may arise due to overdevelopment of the muscles in the area behind the clavicle (collarbone) where major arteries and veins vie for space with muscles, tendons, the spinal column, the first rib, and the clavicle itself. Some people, maybe one in a hundred, actually have an extra rib (called a “cervical rib”) which makes this space even smaller. When a muscle becomes too large and hard from overuse, it can press a vein or artery against a bone or another muscle, causing impaired circulation. Nerves can be pinched as well. In the most extreme cases, the hands become swollen and blue or black. In less extreme cases, the hands and arms simply ache or tingle and swell slightly; this is often mistaken for arthritis. This syndrome is often caused by habitually holding the arms too high, so it’s common for harpists, violinists, floutists, and carpenters.

    Here’s a test for Thoracic Outlet Syndrome: hold your arms out straight from your sides. Now bend them up at the elbows as though you were in a holdup (“Come out with your hands up!”). With the palms facing forward, slowly and smoothly open and close the fingers for three minutes. If within that time you cannot hold your arms up anymore, or if your hands hurt or cease to function, you may wish to see an occupational therapist, and you may need change the activity that overdeveloped the muscles.

    To avoid the above conditions, learn a relaxed technique, don’t practice your music more than about two hours a day, and don’t play when your hands are cold. Warm them up under warm water first if necessary. Always avoid playing when your hands hurt.

    More Sources of Pain:

    Pain in the hand, wrist or arm may also be caused by chronically tight muscles in the neck, shoulders, or back, which can impinge on nerves that lead to the hand. This is called “referred pain”, but nerves that are affected this way also may not send the right messages to the hand (you might try to move a finger one way and it goes another, or it doesn’t respond right away).

    Chronically tight muscles in the neck and back can also pull the vertebrae out of alignment, causing nerve entrapment (all nerves originate and emanate from the spinal column, spreading to the rest of the body like branches on a tree).

    A good chiropractor, massage therapist, and/or accupressurist can help, and stress-reduction techniques such as yoga, meditation and biofeedback may eliminate the underlying causes. Don’t assume surgery is the answer for chronic pain unless all possible causes and other treatments have been addressed first. When surgery is suggested, be sure to get a second opinion, and maybe a third!

    Referred pain and/or tingling in hands may also result from spondylosis in the neck  –  bone spurs on the vertebrae that compromise nerve function. This arthritic condition does sometimes require corrective surgery.

    You may be advised by a physical therapist to wear a brace on your hand or wrist if you have pain do­ing normal everyday activities. If a brace makes your fingers swollen, tingly, or numb, get it properly refitted im­mediately.

    A Checklist for Hands:

    To reiterate, problems with hands/wrists/arms can be caused by:

    • Tense hands
    • Poor hand position/technique for YOUR hand size and shape
    • Stretching thumb forward while playing (see previous post)
    • Plucking or pressing too hard
    • “Flying pinkie” (see previous post)
    • Hand bent outward at wrist (inward is usually OK)
    • Referred pain from poor ergonomics (see previous three posts)

    Next week: more about hands!

  • PART 3 – Discomfort and Pain Related to Playing Your Instrument: Symptoms, Causes and Solutions

    To get the most out of the following information, please read the two previous posts in which I discussed neutral posture (in contrast to the posture most of us have been taught is “correct”), ways in which the holding and playing of an instrument affects the body of the musician, and specific physical problems one might experience from playing an instrument and possible ways to address them.

    In this post I’ll discuss treatments and exercises.

    The information presented here is not a substitute for professional medical diagnosis and care.

    Simple Exercises for Injury Prevention

     Once an injury has occurred, it is essential to stop doing the thing that caused it. This means permanently changing your posture and/or hand position and/or technique. The necessary changes will not necessarily be easy or feel natural right away; they may require patience and focused retraining. I can hear the shrieks of protest already! “But I had to work hard to learn my technique!” and “But it’s too hard to break old habits!” and “I just want to have it get better by reading about it, but I don’t want to DO anything differently!”

    So ask yourself this question: would you rather end up not being able to play at all due to permanent injury (yes, new injuries can become permanent ones if you don’t change the technique, posture, or habit that injured you), or would you rather do whatever it takes to be able to play comfortably for a lifetime?

    It may seem, when discomfort first develops, that it’s not bad enough to give much attention to. As the pain grows, we start hoping it will just go away. Usually, however, it just keeps getting worse. At best it keeps us from enjoying playing our instrument, and at worst it eventually makes playing impossible.

    Muscles get stressed and inflamed from excessively repetitive or constantly fixed flexion (contraction). In other words, they get stiff and painful when they’ve been used too much. This is a sign of damage to muscle tissue, tendons, tendon sheaths, nerves and/or nerve sheaths. Musicians can get tendonitis (inflamed tendons), tenosynovitis (swelling of tendon sheaths), carpal tunnel syndrome (inflammation of tendon sheaths in the wrist area), thoracic outlet syndrome (enlargement and hardening of muscles in the neck area, which causes pinching of nerves and blood vessels), and a number of other conditions that should not be ignored. A healthy muscle is one that is stretched as much as it is flexed. Musicians too often don’t stretch the muscles they use for playing their instruments, so chronic tension from constant or repetitive flexion builds up and those muscles and tendons eventually refuse to move well at all. These conditions can usually be reversed.

    In addition to the possibility of hand, wrist, arm, back, neck and/or hip discomfort, some musicians suffer from rotator cuff injuries. The rotator cuff is the group of muscles at the shoulder joint.  If you have pain in the joint area of the shoulder that will not go away, don’t try to strengthen the area until after you’ve had medical intervention. See a medical specialist and get an MRI. Rotator cuff injuries often involve a tear in muscle tissue, a detached tendon, bursitis, or other conditions that are exacerbated by further motion. Bursitis (inflammation within the joint itself) can be very effectively treated with one or two cortisone shots in the joint; it’s a surprisingly easy solution, and short-term cortisone treatment is not harmful to the body. But muscle tears and tendon detachments must usually be surgically corrected. Some folks are afraid to get the surgery, but if you’ve got a good surgeon (check his or her reputation), it’s so worth it, usually resulting in complete and painless use of the joint. Recovery after the surgery usually requires several months of physical therapy, but it’s much better than a lifetime of pain.

    For discomfort in areas other than the rotator cuff, here are some exercises that can help the muscles used in playing. They should be done GENTLY to avoid further stress to the affected muscles and tendons.

    Exercise 1:        Hold your arm and hand as though balancing a tray. Elbow should be bent all the way and palm facing the ceil­ing. Now, keeping the wrist bent, lead­ing with the heel of the hand, slowly straighten the arm out in front of you un­til it looks as if you are stopping traffic. Stretch the ball of the hand forward and stretch the fingers upward. Then drop the hand forward and bring the arm back un­til the wrist is close to the shoulder again. Do this with both hands.  Be gentle with yourself. You should feel some pull but no sharp pain.

    Exercise 2:        Dangle your arm at your side, palm fac­ing the body. Keeping the elbow straight, bring the hand upward into a cupped po­sition. The hand and arm will form the shape of a “J.” Now rotate the hand at the wrist, one direction and then the other, as far as it will go without strain­ing. Gently shake the hand out when done.

    Exercise 3:        Get some Chinese hand-exercise balls. These are available at most import shops, New Age stores, and some music catalogs. Choose a size that fits comfortably in your hand when both balls are held in the same hand. Rotate them around each other in one direction and then the other. Do this no more than three or four min­utes a day. Not recommended for those with severe tendonitis.

    Exercise 4:        Hunch your shoulders upward toward your ears as far as they will go, hold a few seconds, drop them and shake them gently back and forth. Repeat three times.

    Exercise 5:        Make a half-circle with your shoulder by moving it straight forward, then up to your ear, then back. Repeat several times, and then change direction. When you get good at it, you can make a full circle by adding a downward push as you move from back to front.

    Exercise 6:        While standing or sitting straight, drop the head to one side so that you feel a stretch in your neck.  Hold for one or two seconds, then do the other side. Repeat three times.

    IMHO, the very best physical activity for musicians is yoga. A good yoga routine  stretches, tones, and brings better circulation to all the muscles of the body. Those who do yoga regularly almost never have any issues with discomfort related to playing an instrument.

    Treatments:

    The best treatment for injured muscles and tendons is rest. That means stop using them! If, for instance, your right hand hurts, not only should you stop playing for several weeks, but stop using the hand for other things as well. Comb your hair, brush your teeth, open doors, and carry things with the other hand. Seriously. This isn’t overkill  –  it’s necessary.

    Many folks reach for the painkiller and then keep playing. That just makes the injury worse. Pain exists to tell us something is wrong! It’s telling us to stop using the painful part. Don’t ignore the body’s wisdom. Just masking pain and inflammation does not fix the injury; it only allows us to live in denial for a while longer. What’s more, although NSAIDS (the class of drugs that includes Advil and Aleve) can reduce pain and inflammation, they should only be taken for a few weeks at most. Long-term use of NSAIDS can wreak havoc with the delicate tissues of the digestive system, just as aspirin does with the stomach lining.

    It’s common to apply ice packs to painful areas. When a muscle or tendon has been severely strained and is swollen, hot, and the surrounding tissue is red, using ice can reduce swelling. (Icing only helps if you stop doing what caused the problem and let the injured area rest for at least a few weeks.)

    However, when an injury has come on slowly and there is pain but no inflammation, ice has been known to make it feel worse; try dry heat, such as a heating pad. Dry heat can relax the injured tendon or muscle, and increases circulation to the area.

    If, after a few weeks of resting the affected area, the pain and/or swelling does not subside completely, see a specialist. Beware of sports therapy; music is not a sport and the cause of the injury is not the same. Therefore the treatment of your injury should be very different from sports injury treatment.

    Once your discomfort has eased or disappeared, don’t go back to doing the thing that injured you in the first place. Once injured, the affected part will usually be quite susceptible to re-injury. Learn a new technique, learn neutral posture, etc.

    Concerns of Beginners

    Beginners almost always get sore fingertips from fretting or plucking strings, sore muscles in the hands from stretching in ways they’ve never stretched before, and maybe soreness in the arms. Beginners need to limit their playing time to avoid developing injury from overuse, not to mention blisters. It’s a good idea to accept that there will be some discomfort until callouses develop and muscles get accustomed to stretching. But if there is pain the joints, wrist, neck, back, shoulders or hips, that’s not normal. Nor is prolonged discomfort (more than a few weeks) of the fingers, hands or arms.

    Beginners very often try too hard physically. Playing an instrument is not like wrestling or weight-lifting. On fretted instruments there is a tendency to press way too hard on the fretboard, as though the strings were wild beasts needing to be tamed. One needs to press only as hard as it takes to get the string to sound clearly (which is a matter of finesse, not strength), and be sure your finger is just behind the fret bar rather than in the middle of the space between frets.

    On harps, beginners often stiffen their hands just to pluck strings. Instead, learning a relaxed technique that also brings out the best tone is what is needed. Be sure you have a good teacher, and see The Harper’s Manual, available from the books page at www.laurieriley.com .

    On wind instruments, beginners often press down too hard on the holes or keys. It’s not how hard you press, but how well you cover the entire hole that matters  –  again, it’s finesse, not strength. For flutes with no keys, rather than pressing harder, try rolling the finger a bit so it covers the hole better. If your fingertips just aren’t big enough or your fingers will not reach all the holes, get a flute that is made for smaller hands, or get some keys installed. If you have a keyed flute and the pads do not adequately cover the holes with an easy touch, get your flute re-padded!

    No matter your instrument, a good teacher should notice if you’re tense when playing, or if you’re trying to use too much muscle strength, and should advise you appropriately. If they don’t, it’s up to you to point out any discomfort or tension you feel so your teacher can help you address it.

    Next week: All About Hands


  • PART 2 – Discomfort and Pain Related to Playing Your Instrument: Symptoms, Causes and Solutions

    This week’s post will be most useful if you’ve read last week’s post first. Last week I wrote about the ways in which the holding and playing of an instrument affects the body of the musician, and about neutral posture (in contrast to the posture most of us have been taught is “correct”).

    Now let’s talk about specific problems one might experience, and possible ways to address them. The descriptions below apply to discomfort we feel as a result of playing our instruments (not from previous injuries, too much typing at a computer, fibromyalgia, and so on  –  those need to be addressed separately). These descriptions are not a substitute for seeing a medical specialist in person for diagnosis and treatment, but they’re a start.

    Sore Neck:

    You may tilting your head, which is what most of us do to see what we’re playing. If we only did it for a few minutes at a time, it wouldn’t hurt us, but we musicians do it for hours. If the pain is annoying but not knife-like,  and  if  your  neck  is  stiff,  you  may  have  stressed a muscle. If it’s knife-like, you might have pinched a nerve. There’s a reason our eyes move in their sockets: so we don’t have to turn or tilt the head so much. Try looking with just the eyes and not the whole head. If you wear glasses and tend to see under the rims, get glasses with larger lenses (For concerts I wear large, rounded glasses that meet my cheeks – it’s the only way I can avoid seeing under the frames. Sure, it looks not so sexy, but at least I can play!) If you see through the wrong part of a bifocal or trifocal, get glasses specifically for playing your instrument. No kidding. It works. Just be sure that when you go to the optometrist to bring your instrument and demonstrate what it is you need to see, so he or she will know exactly what your needs are. Otherwise they can’t help you much and you’ll end up with the wrong prescription.

     Uncomfortable Feeling Between Shoulder Blades Along Both Sides of the Spine:

    You may be looking forward and down habitually with the chin held low. This pulls muscles along the spine because the head is actually quite heavy (think bowling ball). Try this: hold the chin at a normal height and look down with just your eyes. If you wear glasses and this causes you to see underneath the frames, see the above paragraph.

    Sore Shoulders: 

    If the pain is located toward the back of the shoulder along the trapezius muscle (the large muscle that covers the area between the shoulder and the spine) and is accompanied by a little  stiffness, you may be raising  the shoulder habitually. Changing this habit can require close attention, because if you’ve been unaware of doing it, it probably feels normal. It helps if you have someone who can observe as you play and tell you when it’s happening, or if you sit in front of a mirror and check it out every few minutes.

    Soreness Between or Under Shoulder Blades:

    You may be holding your elbows up. Drop them to less than 45 degrees.

    Soreness Toward Center of Back:

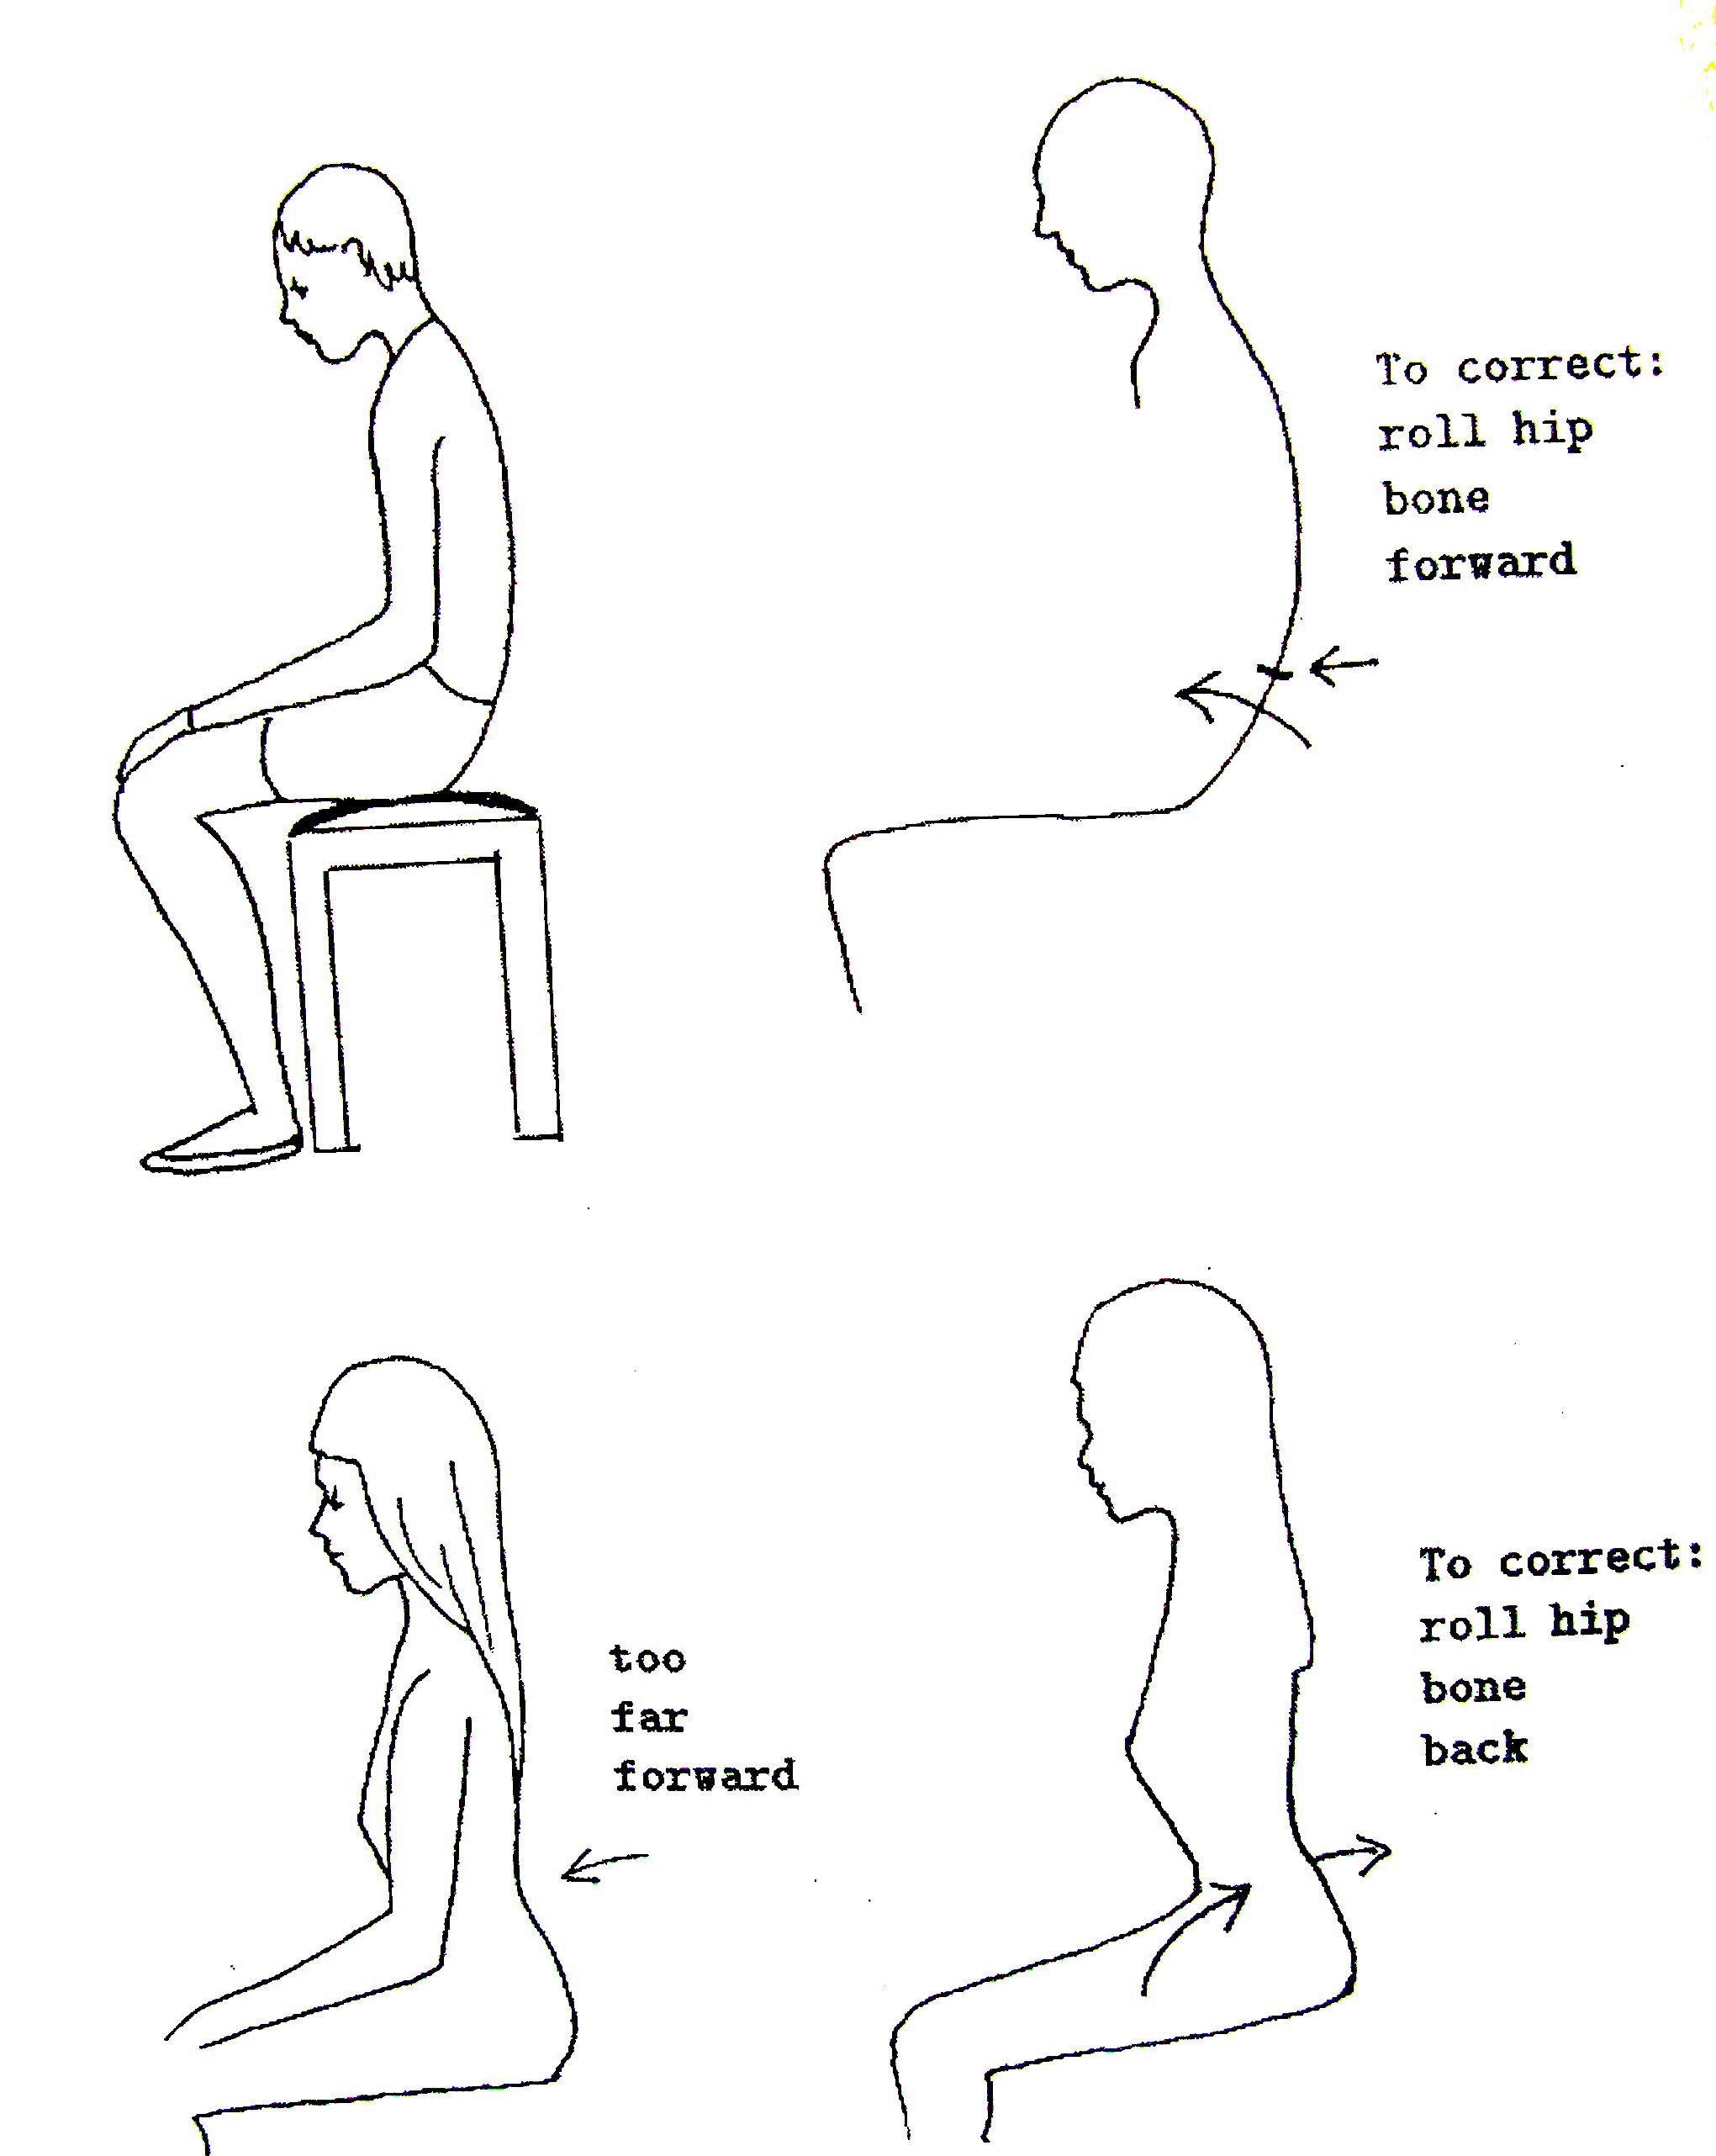
    1. Are you rounding your back and slouching a bit? The fellow in the upper part of the illustration below is slouching. This strains the back muscles that support the spine. See last week’s blog on neutral posture, and adjust your instrument to that posture.
    2. You may be swaying your back too much. The woman in the lower par tof the illustration below is swaying her back. Amazingly, most people do this, because we’ve been taught that it is “correct”. But it causes many problems. Relax the top of the pelvic bone backward to eliminate the exaggerated curve in the lower back. (How do you know if you’re doing this as described? One easy way is to notice whether you tend to breathe in or out when doing moving the pelvis. If you inhale, you’re swaying the back even more by rolling the pelvis forward. If you tend to exhale, you’re doing it right.) Sorry I could not provide a larger illustration here; wordpress doesn’t provide much choice in formatting.

    Pain in Upper Forearm Near Elbow:

    Your pinky may be sticking out stiffly as you play. Believe it or not, I’ve observed that the “tennis elbow” feeling many musicians get is actually alleviated when they learn to keep the pinkies relaxed.

    Stiff Fingers:

    1. This is usually caused by the mistaken idea that plucking strings, fretting, or closing holes in wind instruments requires strength. It does not. It only requires finesse, which you don’t have when your fingers are tense. Tension in the hands can often be remedied by consciously relaxing them, which may take a lot of concentration until a new habit is formed.

    2. Some tension comes from how you hold and use your hands, either on purpose or without thinking. For hands that pluck: you may be stiffening the fingers before plucking, and/or plucking too hard; or you may be spreading (splaying) your fingers  –  in other words, stretching them apart from each other (you can see the webbing between them as you pluck). Fingers that pluck don’t have to avoid each other; they can brush past each other as they move. Dexterity is lost when fingers are splayed.

    3. For hands that fret an instrument: of course you have to reach to place chords and such, but in some cases if you turn the palm of the hand to face toward your body you will find that your fingers actually reach farther with less stress.

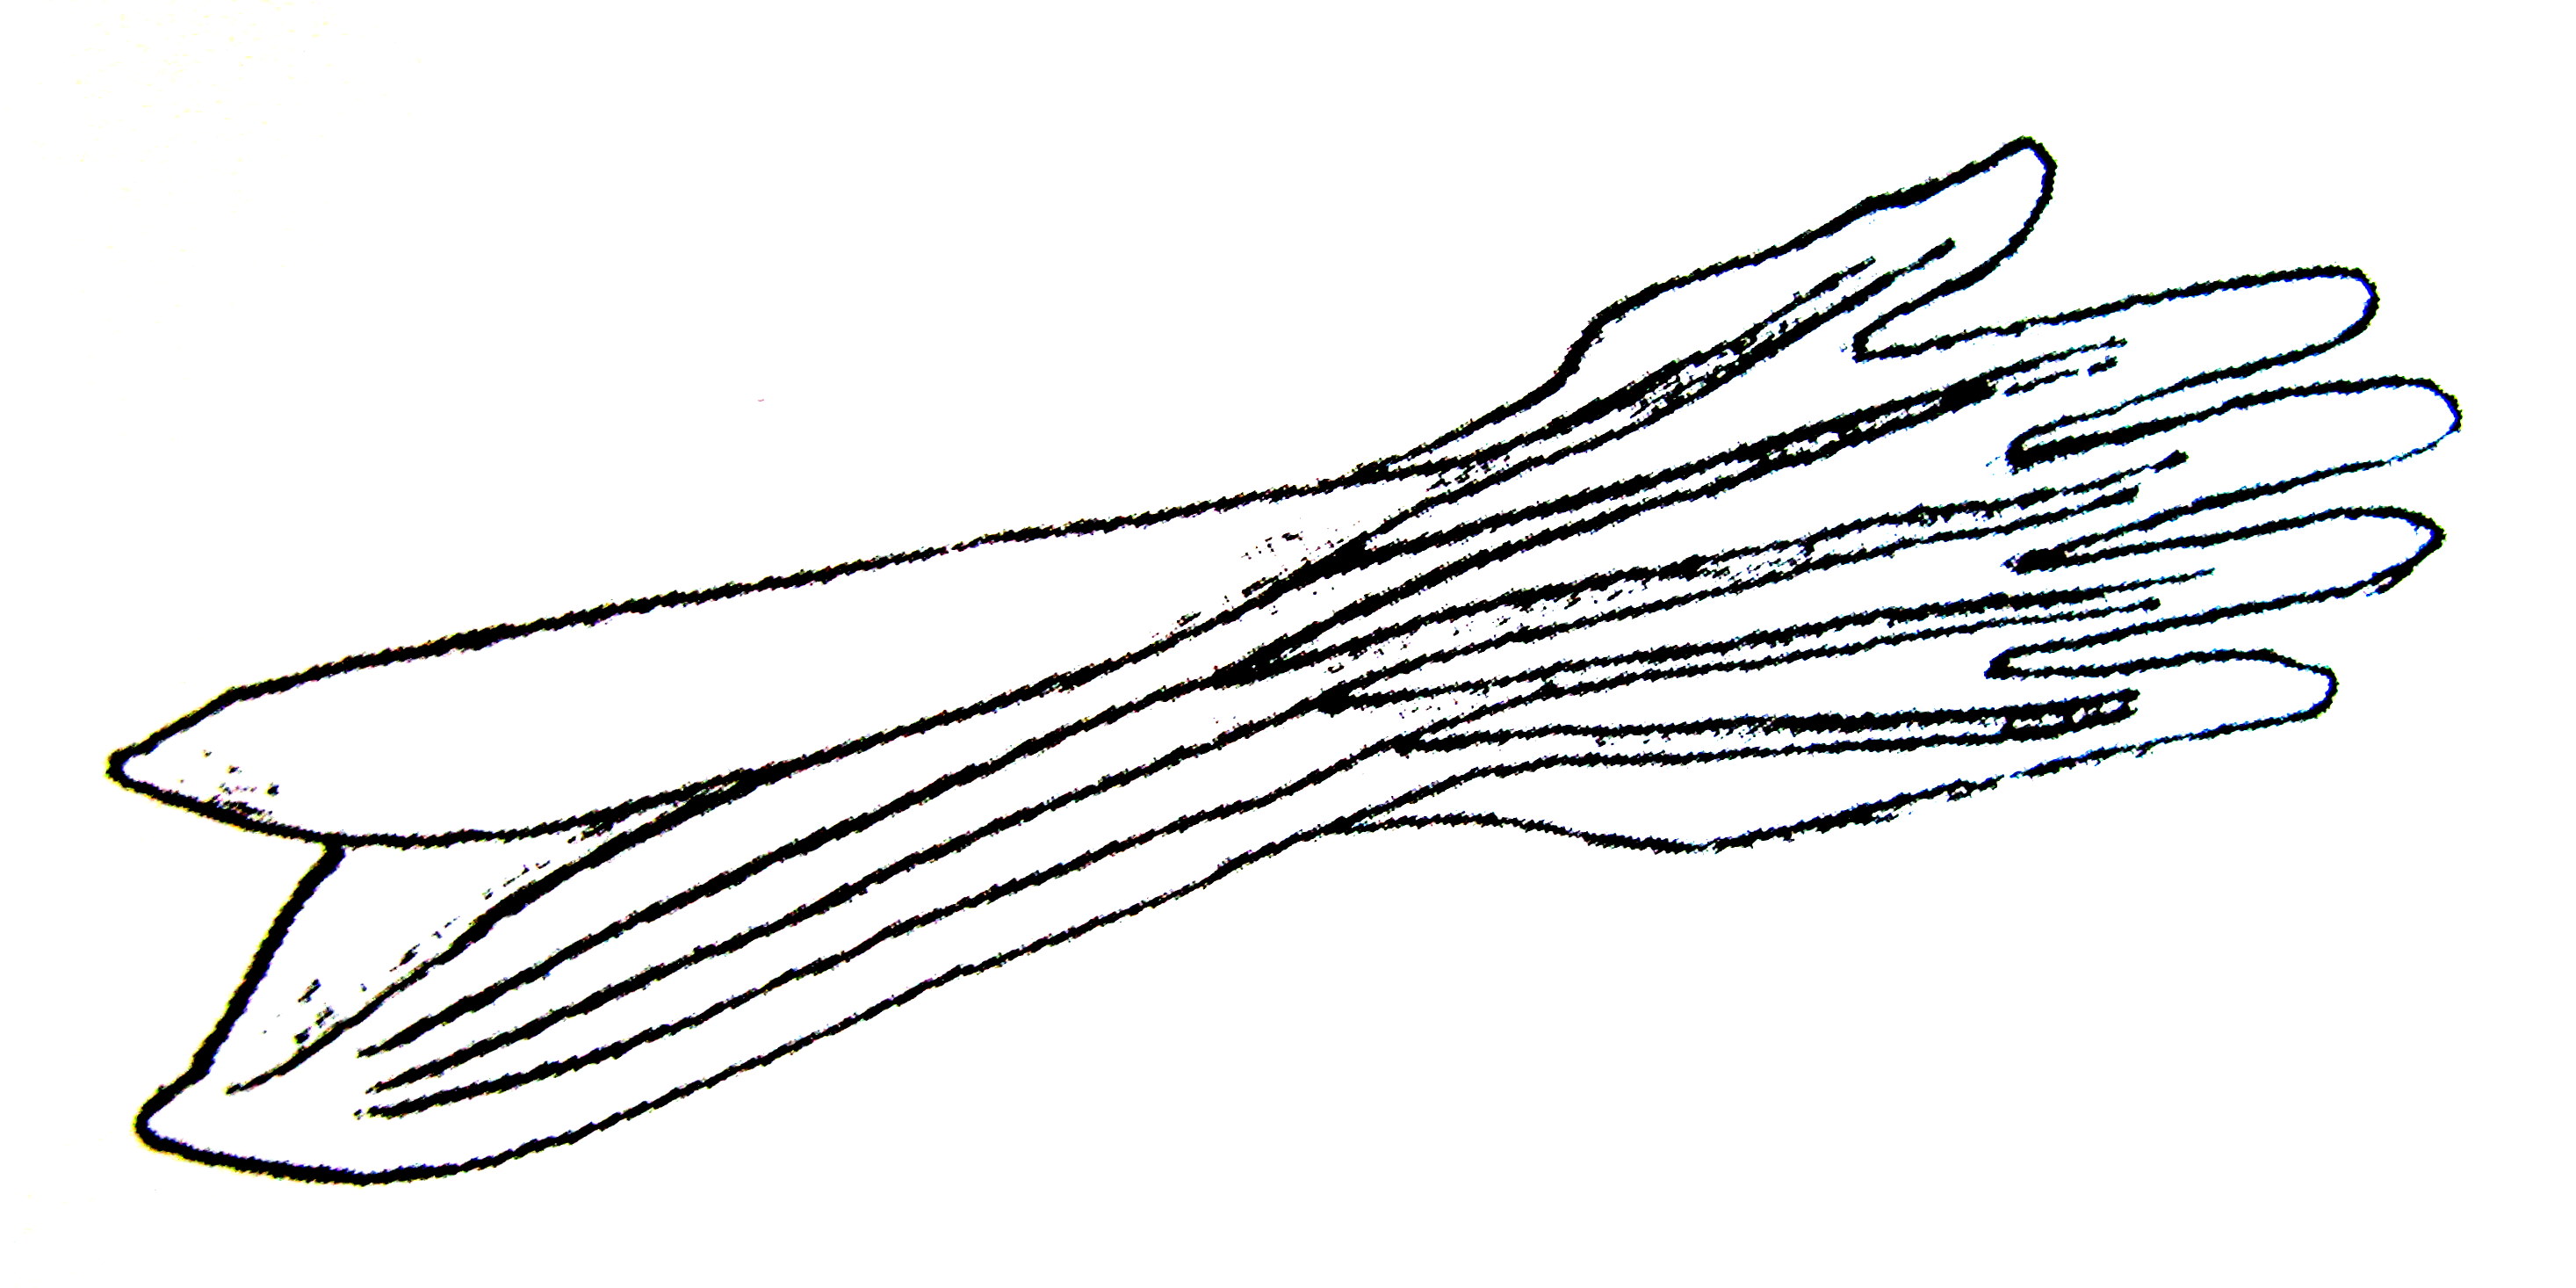
    4. You may be resting your forearm on the edge of the soundbox of your instrument. To show yourself what this can do to your tendons, take an elastic band, stretch it, then bend it around the edge of your instrument and pull it back and forth in a sawing motion. The tendons inside your arm are like that elastic band. When the tendons of the forearm are compromised this way, it can affect your dexterity, because those tendons are connected to your fingers.

    This is a rough drawing of the tendons of the fingers, and the muscles they attach to in the forearm.

     5. Sometimes hand tension comes from feeling nervous; that’s a whole other ballgame. Sometime in the future I’ll blog about stage fright. (Some folks even get stage fright in front of their teachers or friends. It’s still stage fright.)

    Pain in Wrists:

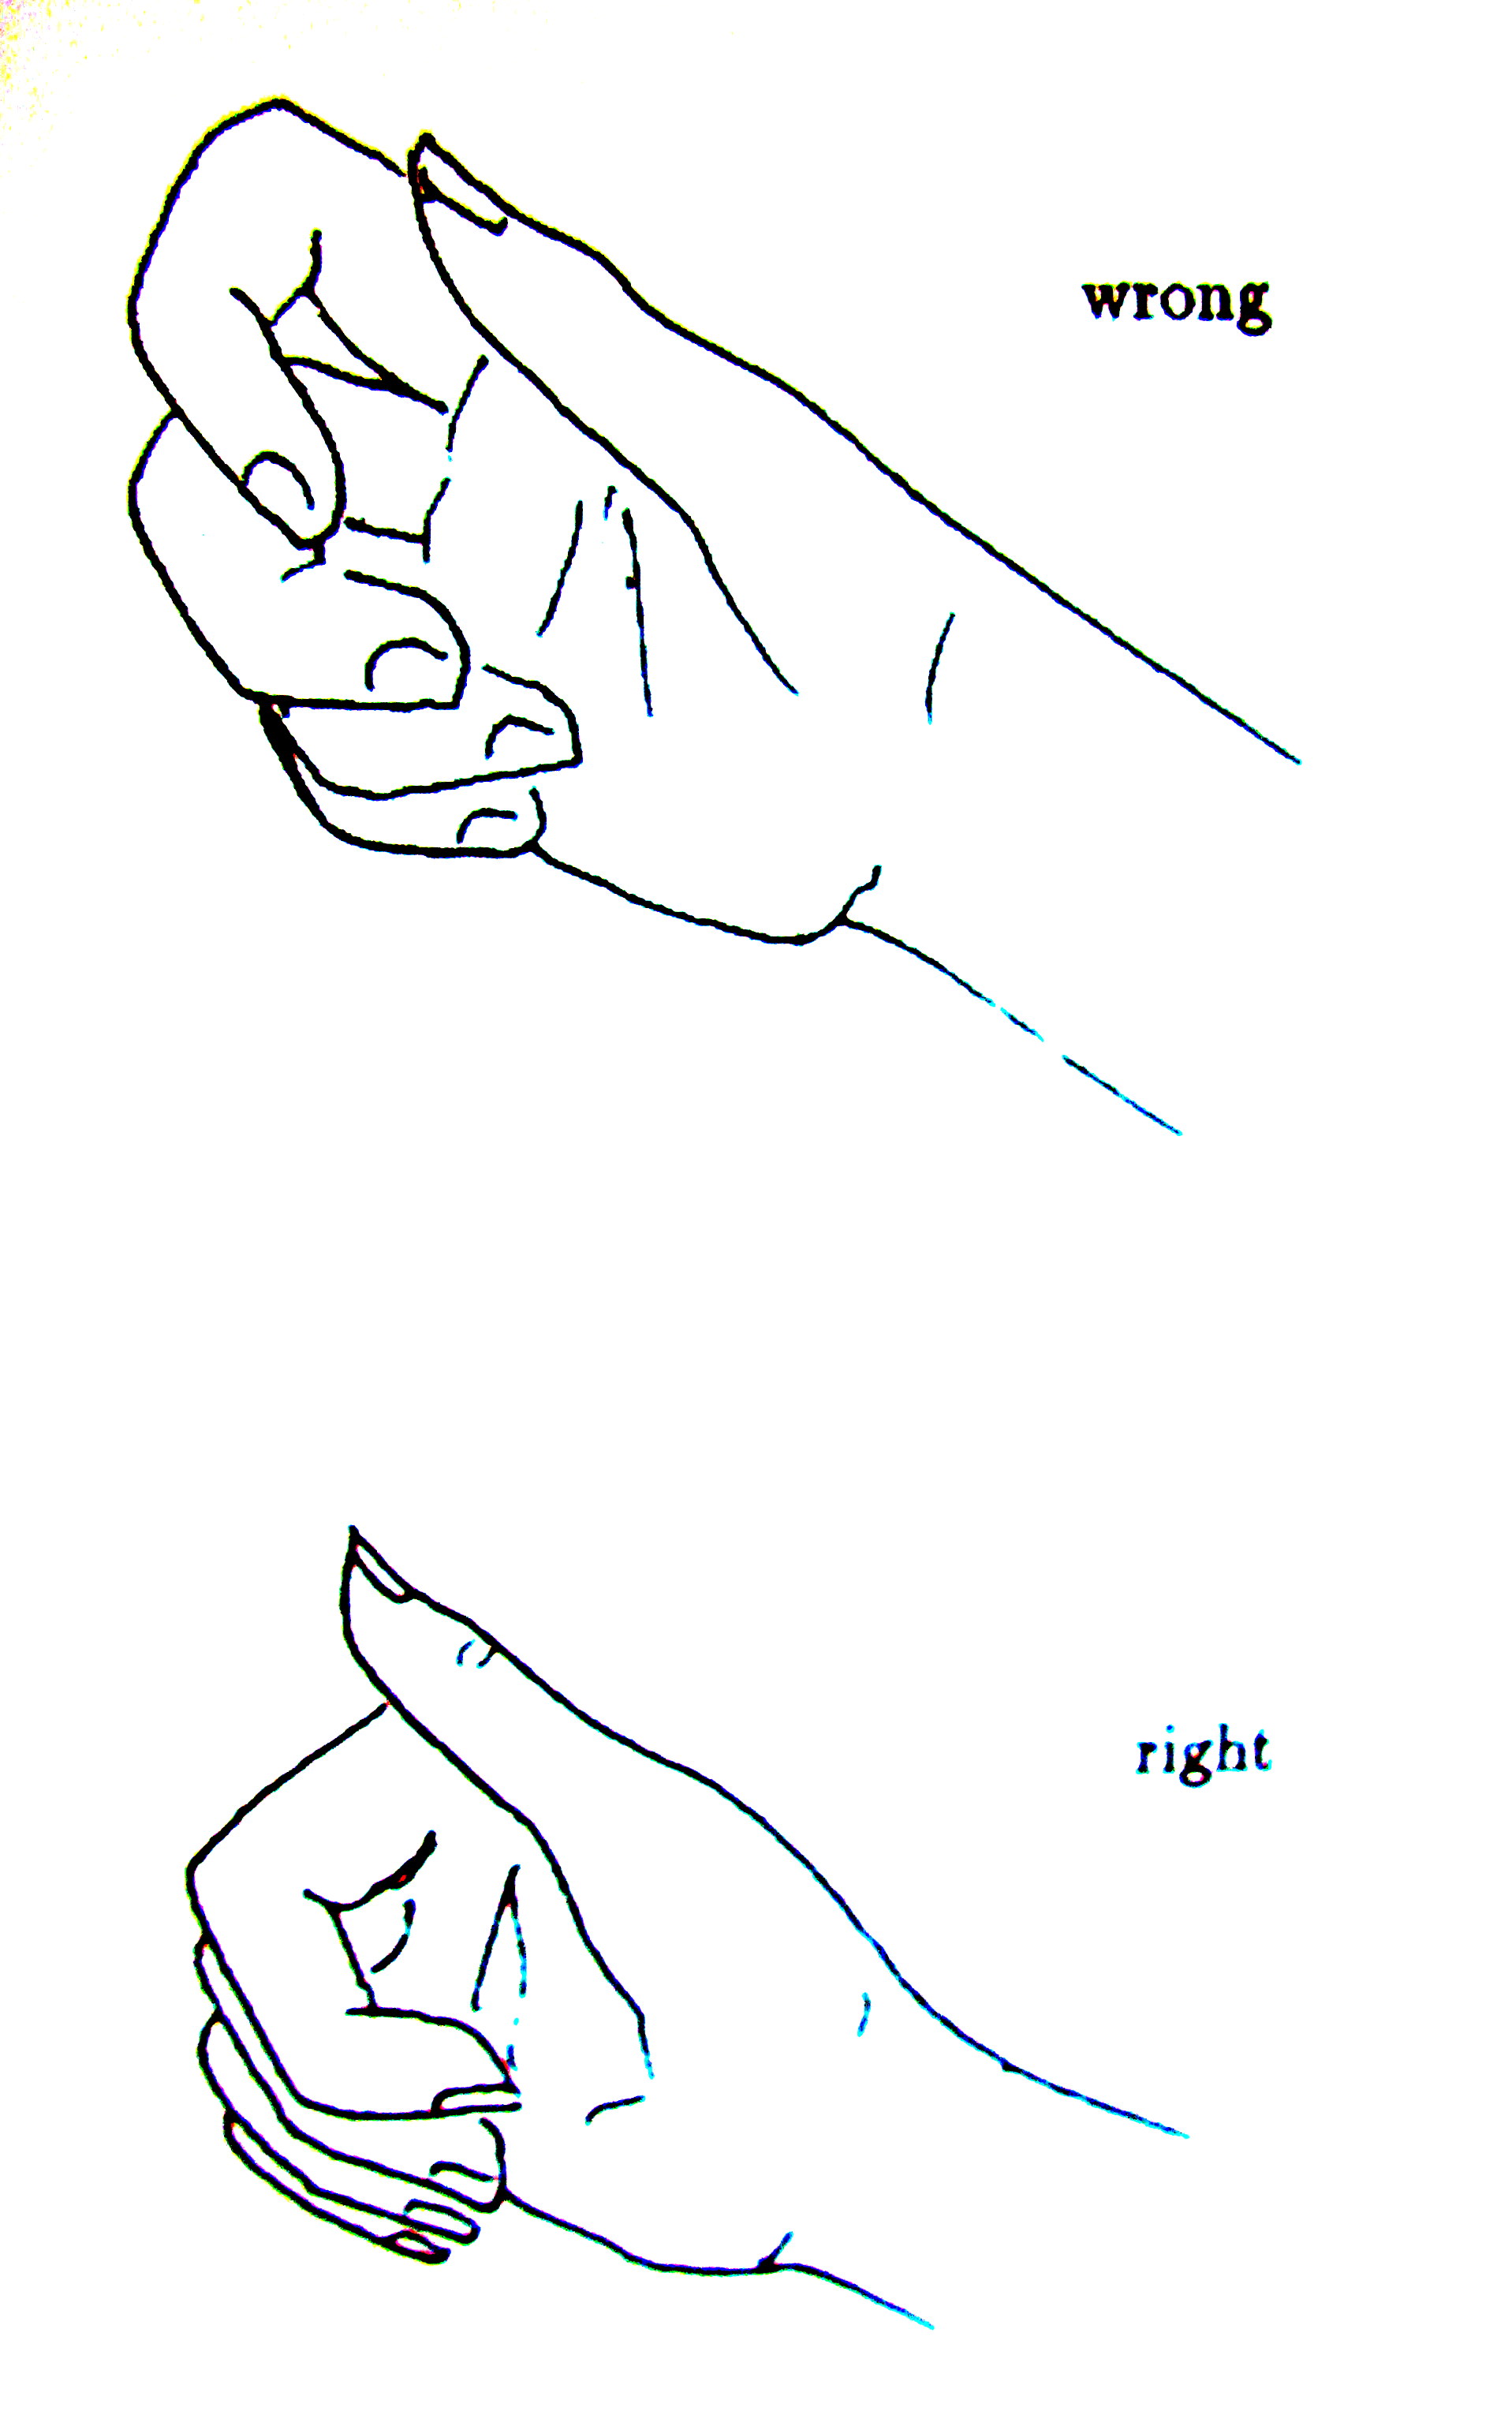
    This is often caused by bending the wrists and trying to play at the same time. Avoid playing with your wrists bent as in the illustration below, because the carpal bones are crowded in that position, and the tendons cannot work properly when they are also holding the hand in that position, which is one of the prime causes of carpal tunnel syndrome.

    Any repetitive thing you do with your wrist bent in this direction isn’t a good idea.

    Pain in Palm of Hand Near Thumb:

    1. You may be reaching forward with your thumb as you pluck, as though you were trying to make it longer. The thumb is fine at the length it is! Relax it. For fretted instrument pluckers, one way to better reach with the thumb is to bring the hand around so it looks like you could hold a tennis ball; this puts all the fingers and thumb in easy reach of the strings. For harpists, be sure there’s a large open space between the thumb and the rest of the hand when you pluck, which allows you to pull the string away from you rather than pushing it away from you (and be sure to close the thumb after each pluck); see the Harper’s Handbook for detail.

    2. For those who hold a flat pick, you may be grasping the pick too hard. Holding onto a pick can be tricky, but grasping too hard doesn’t help and makes it hard to play. Many try to hold the pick between the thumb and the index fingertip. It’s much easier and less stressful to hold it between the thumb and the first joint of the index finger. There’s more contact area that way, allowing the pick more flexibility. There are picks that have texture on the part you hold, which helps keep them secure, especially if your hands sweat. You ca also experiment with how thick and how stiff the pick material is; there are many choices.

    Pain in Center of Palm of Hand:

    This is often accom­panied by stiffness of the fingers. It’s often caused by bending from the second finger knuckle to pluck, whereas you’d be better off plucking from the joint where the finger meets the hand. Plucking with the whole finger is far less stressful and produces better tone.

    Pain in the Back of the Hand:

    1. This may be from lift­ing the finger away from the string when plucking. When the second finger knuckle is lifted higher than the knuckle where the finger is joined to the hand, the tendons are stressed.

    Many musicians who played piano first are prone to doing this, because they were taught to lift fingers away fro the keys. (There are two vastly different piano techniques; one requires lifting the fingers while the other requires pulling them inward toward the palm. IMHO, the latter is better physiologically.) Plucking strings properly can require forming new habits of finger movement.

    2. Splaying the fingers can also be a cause (see paragraph on stiff fingers).

    3. Harpists: the strings of the harp should vibrate toward and away from you when plucked, not side to side. Therefore, don’t pull outward when you pluck. Pull toward your body with the fingers and away from your body with your thumb.  There is a detailed and illustrated discussion of this in The Harper’s Manual.

    Fatigued or Weak Arms:

    This may be due to habitually holding the hands above heart level, and it’s common for fiddlers and flute players  –  see the discussion on ergonomics in last week’s post. Or a raised elbow can be to blame –  just keep it lower.

    Pain in Hips or Upper Legs:

    1. This is often the result of leaning to one side when sitting down.

    2. You may be sitting with the knees higher than the hips, which puts too much pressure on the hips and can strain lower back mus­cles, too. Try this: sit with equal pressure on both glutei maximi, and make sure your chair is high enough so that your knees are a bit lower than your hips. 

    Pain in Lower Back:

    1. Possibly you are rolling the top of the pelvis too far back or forcing it too far forward. In the first case your lower spine will be convex, and in the second, concave. Either way, this can strain lower back muscles. If you’re swaying your back, relax. If you’re slouching, sit up! (See posture illustrations above.)

    2. Or you may be leaning backward. This is very common; ask someone to observe you and see if this is the case. People often lean slightly backward, thinking they are upright, especially if the instrument is large and/or leaned on the shoulder.

    Dizziness, Faintness:

    1. There can be many causes, but if this problem developed as a result of playing your instrument, there is a chance you have misaligned a cervical (neck) vertebra. A chiropractor can diagnose this problem and treat it. Realigning the vertebrae can bring immediate relief. (If it doesn’t, see a medical doctor in case you have an unrelated medical condition.)

    2. Another possible cause is strained neck muscles, which can affect the structures of the inner ear that are responsible for equilibrium. You may be simply tilting the chin too high or bending the neck back too much, especially if you tend to lean forward a lot; this compromises the first cervical vertebra. Sometimes just straightening the neck can help. Of course a skilled, certified massage therapist can help a great deal.

    Back or Neck Pain Not Relieved By Any of the Above:

    You may have misaligned a vertebra in your back or neck by using poor posture, by carrying a heavy things, or from an unrelated injury. A chiropractor and physical therapist may help.

    NEXT WEEK: Simple Exercises for Injury Prevention, and Treatments

    By the way, if you have subscribed to this blog (by clicking “FOLLOW”) and you are also getting e-mail notices directly from me when I post, you can e-mail me to tell me you’re already subscribed. My e-mail address is laurie.riley@live.com

  • Discomfort Related to Playing Your Instrument: Symptoms, Causes and Solutions

    This information is not a substitute for medical diagnosis and/or care.

    This discussion will be a five-part series (I’ll post one part each week for five weeks) on the subject of avoiding and correcting discomfort and pain related to playing your instrument.  It also addresses the causes of awkwardness or lack of agility and control when playing.

    Part 1

    Although we hate to admit it, even to ourselves, most musicians at some time experience physical discomfort, pain, or even just lack of agility when playing our instruments. Most musicians just try to ignore the problem when it first arises, thinking it will go away or that we just have to put up with it as the price of playing an instrument. Trouble is, everyone discovers over time that the problem does not go away. It affects our playing physically and/or psychologically, and some even develop chronic (long-term) injuries.

    The most important things to know about discomfort, pain, and/or lack of agility related to playing an instrument are that if you don’t address it, it will always be there; but you don’t have to put up with it  –  you can do something about it.

    The issues can be broken down into three categories:

    1. What happens to your body with and without good ergonomics
    2. What happens to your hands when you play
    3. What happens when you’re learning/beginning an instrument

    Let’s start with what happens to your body when you play (ergonomics). Musical instruments are designed to produce  optimal sound for their design; in other words, an  instrument is shaped and constructed with a specific kind of sound in mind. A mandolin has to sound like a mandolin, a guitar like a guitar, etc.  For stringed instruments, how they’re built depends on the number of strings, frets, and the range and tone desired. Obviously some attention is paid to the fact that they have to be physically playable by the average person. But in general not enough attention is given to the fact that the average person must hold, and make repetitious movements on, an instrument for hours and hours, day after day.

    When someone picks up an instrument, the first thing they tend to do is adjust themselves to it. After all, the body is flexible and the instrument isn’t, right? But after a few hours or a few days or weeks, we start complaining of stiff necks, sore shoulders, wrist pain, back pain, headaches, eyestrain, etc., etc. If you don’t practice a lot you won’t learn, but the price of a lot of practice might be carpal tunnel syndrome, vertebral subluxation, tenosynovitis, tendonitis, and/or some form of chronic neuralgia. Aside from the sore fingertips and such that beginners experience, if we mistake the above problems as just beginner’s pain, we’re in for a rude surprise.

    Before it’s too late (when a chronic injury develops that curtails your ability to ever play again), we have to learn to adjust our instruments to ourselves, not ourselves to our instruments. This concept is best known as “ergonomics”. The term ergonomics is bandied about by pretty much everyone these days, mostly without a full understanding of its meaning. So I’m going to go in to detail on exactly what “ergonomics” really means and how its concepts are best applied.

    Think of ergonomics as all of these:

    • The optimal way to sit or stand
    • The optimal way to hold the instrument
    • The most stress-free way to use your hands to play
    • Optimal ways to move with the music while playing

    It is possible to achieve all of the above without compromising the tone and playability of your instruments.

    Why is it that when I first say the word “ergonomics”, an entire class will shift in their chairs and sit up ramrod straight? The word “ergonomics” is not synonymous with “posture”. Posture is only part of the equation, but not that stiff military posture most people think of as “correct”. It isn’t.

    Military posture is hard on the body; it’s stiff, the chest is out, the back is swayed, and the chin is forced in. If standing, the knees are locked. No wonder so may soldiers faint when standing at attention for long periods. There is nothing good about that posture, whether standing or sitting. Yet most of us use some form of it habitually. For most people its most damaging effect is  an exaggerated sway in the lower back, which eventually causes a lot of pain. It’s interesting that when one says, “Stand up straight,” most folks sway their backs. That’s not straight.

    True ergonomic posture is called “neutral posture”, a relaxed (but not lazy or sloppy) postition in which no group of muscles works harder than any other group to hold you upright. It causes no pain and can be maintained comfortably for long periods of time.  It can feel unfamiliar at first, and some folks resist it for that reason. But it’s well worth forming a new habit. Here’s how to achieve it:

    If you sit to play your instrument…

    1. Choose a chair that is reasonably comfortable, and of a height that puts your knees a bit lower than your hips, or at least the same height as your hips, but your knees should never be higher than your hips (which stresses the hips and lower back, which in turn transfers stress to the upper back as well). A wedge-shaped firm cushion (not a soft pillow) can help.
    2. Sit toward the front edge of the chair.
    3. Be sure your feet are both firmly on the floor, with a little weight on them.
    4. Raise the sternum (breastbone)gently  so you’re not slouching, and then relax the lower back so the top of the pelvic bone does NOT tip forward. With your fingertips, feel your spine at the lumbar area (lower back); if it feels like the spine is in a valley between two muscles, your back is too swayed. Roll the pelvis back a little more until the valley flattens out  –  now your back is actually straight. (Many people think at this point that they are slouching, but a mirror will show you that your back is truly straight. )
    5. The raised sternum and the relaxed pelvis will stretch your spine a bit, allowing better circulation and room for discs to function properly. It should feel pleasant, even if it’s unfamiliar at first.
    6. You will probably feel that the abdominal muscles are engaged more than you’re accustomed to. That’s because they are now doing half the job of keeping you upright, instead of putting the entire burden on the back muscles.
    7. Tilt your head forward and back until you find a “weightless” spot, where it’s balanced.
    8. If you feel reasonably comfortable, you have now achieved neutral posture.  can move around while playing, of course, but this is the posture to which you can aim to keep returning every few seconds, as the base from which all your movement happens.
    9. Don’t forget to breathe.
    10. If you stand with your instrument, start with #3, being sure your back isn’t swayed and your shoulders aren’t hunched.

    This is the posture to which an instrument can be introduced and adjusted. Don’t lose it when you grab your instrument! Adjust the instrument to it, not vice versa. Specifically:

    • Fiddles, which are usually played in such a way that the right shoulder works too hard, and the arms are too high, can be held with the strings facing forward instead of upward, so the right arm is lower and the bowing action is vertical instead of horizontal; or the fiddle can be held against the armpit rather than on the shoulder, which allows the arms to be lower.  I know these seem weird, but there’s successful precedence for both of these positions.
    • For guitarists, there are boosters that attach to the bottom of the guitar to hold it higher on the lap. For expertise on guitar ergonomics please contact Flip Breskin  –  her website is http://flip.breskin.com .  Some guitarists use foot stools, which make your lap higher, but they also compromise circulation in the legs; that’s not a great idea. Straps are good when you’re standing up, but for most of us they don’t work very well when sitting down. So have a look at what Flip sells and listen to what she recommends.
    • Harpists, don’t lean the harp back too far (most harpers do); it only needs to lean just enough so it won’t bounce forward when you pluck the strings. The idea that the strings must be perpendicular to the floor is a myth. Lean the harp on your right thigh or knee, never your shoulder. It’s OK for your shoulder to touch the harp, but no weight should be there. When hands are placed on the strings that are in the middle and lower ranges of the harp, they should be lower than the heart; it’s OK to place lower than the mid-point of the string. Also, you can angle the harp to see the strings, rather than holding it perpendicular to the body. For complete and detailed information, see the Harper’s Manual, available at www.laurieriley.com )
    • Mandolinists and banjo players, use a strap so the hand that frets the strings doesn’t also have to hold the weight of the instrument. Keep the neck high so your left wrist doesn’t have to bend around too far to reach the fretboard.
    • Singers, take voice lessons. Your exact posture makes a world of difference in how your voice sounds and whether or not it feels good to sing. Trying to guess or figure it out yourself may or may not produce good results.
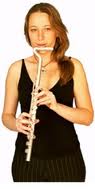
    • Some flute players who have developed shoulder and neck problems have had special stocks made which bend at a right angle so the flute can be played with the arms relaxed. Below is a flute with a right-angle stock that does not change the tone of the flute:


    For more detail on all of the above, please see the book and/or video You Are Your Instrument by Julie Lyon Lieberman, available at http://julielyonn.com/frames.php?page=books&menu=corne .

    In the next five weeks I’ll discuss specific types of discomfort and why they occur, exercises for injury prevention, a discussion on hands, and more. If you have specific questions, I can do Skype lessons one-on-one with you. My e-mail is laurie.riley@live.com .

    If you like this blog, tell your friends. To get notices of new posts, click “FOLLOW”.


  • Session and Circle Etiquette, Styles and Skills, Part 2

    Last week I posted the first part of this article. The information below will be most useful if you read last week’s blog first.

    By the way, if you click “Follow”, you’ll automatically get notices when I post each new blog. (I’ve been sending e-mails when I post, but at some point will stop doing that.)

    If you like this blogsite, please let your friends know!


    Sessions and Circles – Part 2:  Skills, Styles and Etiquette

    Skills

    Some newer musicians wonder how they’ll ever learn the skills they need to be able to join a session, since there are usually no classes or workshops on session skills. In the “old days” in most traditions, young musicians learned music at home from older ones, and listened or joined in weekly or nightly sessions until the music became part of who they were. These days, most people haven’t been lucky enough to have that kind of upbringing.

    As an adult learner, it’s great when you can find a slow jam in which the tunes are taught and played many times through. If none are available in your area, get as many recordings as you can find in your chosen style, play them over and over again in the background as you go about your day, every day. By the time you find yourself humming along with them, you’re ready to teach yourself to play along with them.

    “Teach myself?” … I can hear the exclamations of disbelief already! As certain as you might be that this is a crazy idea, through eons of human history musicians have been able to teach themselves quite a lot, and you’re no exception. I’m not saying no one needs a teacher, but in the absence of one, or when your teacher can’t show you a specific skill you need, teaching it to yourself is a viable alternative. Sure, it might feel like a struggle at first, but don’t give up. Most of us have the ability to learn what we hear, and to play along, if we accept that part of the learning process involves a struggle. It’s actually the struggle that helps us learn better. When you feel you’ve accomplished what you hoped for, other musicians can help you fine-tune it.
    Etiquette

    Those who regularly attend song circles, sessions, and other group music-playing activities seem to know what the appropriate etiquette is. But if you didn’t grow up participating in sessions, how would you know unless someone tells you?

    A session or circle at a music camp or festival is like a conversation at a party. If you saw two or more people engaged in conversation, you wouldn’t join in without knowing if you’re welcome and what they’re talking about. If you knew nothing about the subject of the conversation, or if it was clear that the people in the discussion knew a great deal more on the subject than you did, you’d just listen. But after a time, if the group welcomed your presence and you had something of interest to contribute, you’d probably join in. It’s unfortunate when someone doesn’t observe before joining a circle or session, or makes assumptions about its format; it can feel like a bulldozer just drove in.

    Therefore, one can approach with consideration for the other participants:
    • If the chairs are in a circle, it usually means the main participants are sitting in that circle.
    • If no one outside the circle is playing but you sit there holding your instrument, hopefully someone will notice and ask you to join the circle.
    • If they do notice but don’t ask you to join, that probably means it’s a private session.
    • If there are available seats in the circle, it’s a good idea to observe on the sidelines first to determine whether you’d be welcome to sit there.
    • If the chairs are set in a circle and the only people playing or taking turns are in that circle, then sitting outside of it can signal that you just want to listen.
    • If there are people sitting outside the circle but playing along, chances are that’s all they want to do, and not lead any tunes.

    I think the most obvious signal for joining or not joining a session is body language. If, say, a few people are playing together and they smile and beckon you over, it’s obvious you’re welcome. If they continue to focus on each other or ignore you totally, chances are they’re in the middle of a purpose-driven practice or for some other reason it’s best for you to just listen. (In a case like that, when they’re done with the tune they’d be polite to explain; i.e. “We’re practicing for tonight’s concert”).

    Aside from sessions at music camps and festivals, a session that is its own event and is advertised to the music community at large is obviously meant to be open to all arrivals. In that case there’s no question about whether it’s OK to join in, but general etiquette still applies.
    Pro Sessions

    Sometimes a group of professionals will get together to enjoy each others’ skills; these might be friends who rarely see each other and for whom such a session is a rare treat, or if they tour a lot they might not often get a chance to jam with others of equal skill. A person can get hungry for the company of other musicians at their own skill level! These folks need that time together just as much as amateurs need the company of their own peers. So if you feel like you’re in high cotton, keep a low profile.

    On the other hand, professionals can be bulldozers sometimes. One evening at a banjo retreat, a teacher was leading a jam for the students. He sat in the middle and the students sat dispersed around the room. After a while, a few other teachers came in, pulled up their chairs around the first teacher in a tight circle, and began playing tunes exclusively among themselves, not acknowledging the students and in complete defiance of the fact that they had just usurped an intermediate-level session. What surprised me even more is that the students didn’t get up and walk out en masse; they were so awed by their idols that they assumed it was OK for them to be unspeakably rude! But rudeness is never OK no matter who you are. Eventually the retreat organizer made a policy that all early-evening sessions had to be open to all participants. There are many amateur musicians for whom such a session may be the only chance they get to play music with other people. This is how skills are learned. So if your skill level is more advanced than the majority of those in a particular group, play quietly and simply and blend in. Otherwise, people can easily be so intimidated that they are discouraged from playing at all.

    No matter who you are, it’s a good idea to refrain from ever telling a group they’re doing something wrong. I remember one fellow from New York who came to a camp in California and told us that we were all playing the wrong chords to our session tunes; that he knew the right chords because that’s how they do it in New York! It never occurred to him that perhaps we were doing it the right way for California, and he was the one who needed flexibility.
    Styles

    Before joining a circle or session, it’s important to determine what style of music is being played. Bluegrass? Old Time? Celtic? Songwriting? If it’s not a style you know, it may be a good idea to be a listener until you’re familiar with the nuances of the style. Each style has a personality all its own.

    Additionally, certain styles of music are usually played on instruments specific to the style. For instance, a bluegrass banjo doesn’t fit into a Celtic session, an Irish flute isn’t right for bluegrass, a bagpipe just won’t work in an Old Time session, and so on. On the other hand, some groups welcome instruments that aren’t commonly used in the style, if the player blends in nicely. But it helps if the players know you first; just showing up with an out-of-the-style instrument to a group you’ve never met can be awkward.
    Closing thoughts

    If you’ve been observant and careful and still someone isn’t being welcoming, don’t worry about it. Some folks just have issues. Just have fun! Circles and sessions can be positive and amazing experiences, and ought to be stress-free. I enjoy them at least as much as formal performance, maybe more.

  • Sessions and Circles: Styles, Formats and Etiquette – Part 1

    For eons in every culture, musicians have gathered to play together. In some communities, regular music sessions and circles provide entertainment and growth opportunities for musicians of all ages and skill levels, a tradition that is worth nurturing. What I love about them is that we get to hear music made by everyone and anyone, straight from the heart. They’re a great opportunity to test  new material before performing it, to play things one might never perform for one reason or another, to practice playing in front of people, or just to play or sing along with our favorite tunes. Most of all, they’re a wonderful way to enjoy our fellow musicians.

    Since sessions and circles have many different formats and styles, it can be a bit confusing – not just for the less experienced, but for any musician. Here are some clarifying details gleaned from 45+ years as a group/session/circle player (geez, I don’t feel that old). These are my own observations; and since I’m not the Music Police, this information is meant only to inform and assist.

    Formats

    Circle Format:
    There is usually no leader. Turns progress around a circle, with each person either choosing and leading a tune or doing a solo. (Occasionally turns are random, but that is a less common format and might be due to someone not being observant.) Observe whether all tunes are participatory or not, before doing any solos.

    Session Format:
    Usually, a session leader chooses and starts all the tunes. The leader might nod to certain musicians to take “breaks” within tunes. He or she might also ask certain other musicians to choose and start some of the tunes. I’ve been interested to observe in the last several years that a few session groups use printed music rather than following the venerable tradition of ear-playing/memorizing. (In this day of electronic recording gadgets I find that surprising, since making and learning from a recording is so easy to do.) To me, it shifts the focus from hearing and enjoying the whole group to concentrating on the printed page. It also prevents spontaneity in tune-choosing.

    Bluegrass Sessions:
    Often there’s a group leader, or maybe two or three, who choose and start the tunes. They set the tempo, and they decide when the tunes will end. If there are lyrics, the leaders often sing the verses but everyone can join on the choruses. Sometimes turns are taken for instrumental “breaks” (interludes), and sometimes for vocal verses. Instrumentals have set keys, which prevents wasting time deciding what key to play them in. Vocals, however, are keyed according to the singers’ voices.

    Old Time Sessions:
    Same as bluegrass format but often a little more relaxed, and the tunes may run into each other without stopping, creating long medleys. Participants have to listen carefully to hear when a new tune is starting. Sometimes the leader nods when a new tune begins. Instrumentals have set keys, which prevents wasting time deciding what key to play them in. Vocals, however, are keyed according to the singers’ voices.

    Folk Singing Circles:
    Usually songs are participatory, done in turns around a circle. Some circles welcome solos and some frown on them. There is usually no leader. The person who starts the tune determines the tempo, key, and rhythm.

    Songwriting Circles:
    Sharing solo compositions, usually in turns.

    Irish/Scottish/Celtic Sessions:
    • A session may include both Irish and Scottish and/or other Celtic style tunes, and some are strictly adherent to one culture only. Usually there is a leader, who is often a fiddler. The leader chooses and starts all the tunes and determines the tempos. He or she may occasionally ask someone to start a tune or even do a solo.
    • Celtic tunes have set keys, but those can vary from region to region or even group to group. Vocals are keyed to the singer’s voice.
    • If you’re in Ireland it’s polite, when first asked to play something, to say, “Next time around”, and not to seem too eager. But if you’re in the U.S., you may have to be more outspoken.
    • In Ireland and Scotland, tempos tend to be more humane than in the U.S, where for some reason everything is played as fast as possible. (A good rule of thumb, really, is never to play dance tunes faster than dancers can dance, even if there aren’t any dancers present.)
    • Each tune is played twice (though a few groups will play a tune three times) and will usually segue into another tune without stopping; therefore two or more tunes with the same or close tempos and compatible keys are done as medleys that can be quite lengthy.
    • In Scottish sessions, a medley might begin with one kind of tune and segue to another kind, such as air/strathspey/jig/reel.
    • If a player is not yet skilled enough to keep up, it’s their responsibility to sit out the tunes they can’t play, rather than expecting the group to cater to them. This is a good reason to bring a recording device and then learn/practice the tunes at home between sessions.
    • In sessions of mixed instruments, if a harpist joins your session please don’t assume that you then have to play all slow tunes or all O’Carolan tunes. In the hands of skilled players, harps are just as versatile as any other instrument, and sound as well on jigs, reels, hornpipes and such as they do on slow tunes.

    Harp Circles:
    • Each one is different. Some are strictly group play-alongs, often using sheet music, either with or without a leader. Some are “show us your newest material or favorite tune” where turns are taken doing solos. Some are a mixture of both.
    • Some harp groups learn ensemble tunes for fun or for informal performances.
    • Some are geared toward a specific skill level, some are mixed.
    • Occasionally at harp conferences and retreats, several professionals will start a high-powered session; usually others are welcome to play along, but the core group should be respected, allowing them to choose the tunes and take the solo breaks.

    ***

    In some sessions or circles, turns are taken not just from tune to tune, but also within each tune. The person who starts the tune gives the cues, such as tempo, and at certain points will nod to one player or another to take a “break” (an instrumental interlude). During these breaks, the others play more quietly so the featured person can be heard. When it’s your turn, accept the challenge if you are confident. If you don’t know the piece or don’t know your instrument well enough to do a pretty good job, you can politely shake your head “no”, with a smile, and let the next person do it. If, however, it is a beginner session or it is clear that those who aren’t totally sure of themselves are welcome to try taking a break, go ahead and do it. After all, how else will you learn?

    At a recent music camp I attended, there were several different sessions happening concurrently in different rooms, with a variety of styles and formats which morphed from hour to hour. One circle was comprised of professionals who were reveling in each others’ sublime instrumentals and harmonies. Another circle was centered around a very good swing singer/guitarist whom everyone seemed to be enjoying playing along with, but they were content that he did all the singing. Another was a group of newly-learning musicians playing songs for each other. And in another there were two cowboy music singers trading songs between them, with some other folks picking along as accompaniment. Late at night there was a circle in which participants of every skill level took turns.

    Specific groups might not always use the same format each time they sit down together. You may have to observe before joining every new session if you don’t know the group well.

    In all cases where the tunes are participatory, the idea is for each person to blend in, not to stand out (except when given a solo interlude within a tune). The joy of making music in a group is to be part of something that sounds good as a whole, and this requires restraint on the part of each musician so that no one instrument is too loud or omnipresent.

    Ending the Tunes:
    How do you know when a tune is going to end? It may seem astounding when an entire group of people, who may never have played together before, ends at precisely the same moment. That’s because sometime during the last chorus or part, the leader has stuck his or her leg out for a moment. That’s the sign that the tune will stop at the end of the current chorus or part. (Why the leg? Because the hands are busy, and verbal cues might not be heard.) If it’s a song with a set number of verses and choruses, the song will usually end after the last chorus and no signal is necessary.

    ***

    Next week: Session and Circle Styles (Bluegrass, Old Time, Celtic, Songwriting, etc.) and Etiquette

  • Demystifying Modes

    His post is twofold: It contains today’s new subject (Modes), followed by photos of some things I’m selling – to see those please scroll down to the end of the post.
    Today’s Subject: DEMYSTIFYING MODES

    When I was a kid learning clawhammer-style banjo, my teacher referred to one of the common tunings as “G Modal”. I had no idea what he meant, and just learned the tuning by ear. Many years later, with some music theory under my belt, I realized it was actually C Myxolydian, and it was no big mystery.

    I’m no smarter than the average person, so please don’t think that because I understand modes I’m some kind of genius. Modes are incredibly simple to grasp when presented logically; the problem most people have in learning about them is that they’re usually taught in the most confusing way! You can learn about modes in ten minutes.

    OK, let’s get started. Don’t just read about it – that makes it seem difficult and too esoteric. If you do it as you read about it, you’ll see how amazingly simple it is. Go to a keyboard or a harp (I’m sorry I can’t write this article with an explanation for every kind of instrument, since they all have different scale set-ups. That’s why in music schools the piano is used; it is visually simple so theory can easily be understood. The harp is even simpler visually, so theory is easily learned on a harp as well. If you use a harp, it should be tuned to a C scale for this.) If you learn to understand the concepts on a piano or harp, you can transfer the knowledge to whatever instrument you play.

    Now find Middle C. Let’s start from there. C and then seven ascending notes on the white keys. Or on a harp, just play the seven consecutive strings going upward from C. (The harp strings are tuned like the white keys of the piano, when you’re in the key of C.) That is called a diatonic scale and you’ll recognize it as Do-Re-Mi-Fa-So-La-Ti. The octave note (eighth one up from the tonic, or “Do”) starts the scale in the next octave. We all knew that just from listening to the song “Doe, a Deer”, even if we didn’t know any technical terminology.

    The diatonic scale contains all the notes of the modes you’re about to learn. A mode is a scale based on the diatonic scale, but which begins on a note other than the tonic (lowest note). You’ll find that if you start on a note other than the tonic and play just white keys (or on the harp, don’t engage any new levers), the new scale will have some notes that don’t fit in the do-re-mi scheme. The unusual scales you get this way are modes. (And actually, the diatonic scale is also a mode: it’s called Ionian.)

    Here’s what makes them easy to learn: do it by their numbers, as follows:

    Ionian – the 1 mode – goes from the tonic (1) note up seven successive notes plus one more to its octave, or, to put it very simply, from 1 to 8. Try saying the number of the note as you play it, “1,2,3,4,5,6,7,8”. (If you say the name of the note, as in C,D,E, etc. you will confuse yourself because the principle of modes is not dependent on the note names, but on their relative positions, or numbers.)

    Dorian – the 2 mode – goes from the second note (2) up to its octave (from 2 to 2). Start on the 2 note (i.e. D) and say the note names as you play them, “2,3,4,5,6,7,1,2”

    Phrygian – the 3 mode – goes from the third note (3) up to its octave, or from 3 to 3. Start on the 3 note (i.e. E) and say the note names as you play them, “3,4,5,6,7,1,2,3”

    …and so on with each mode:

    Lydian – the 4 mode
    Mixolydian – the 5 mode
    Aeolean – the 6 mode
    Locrian – the 7 mode

    In any key there are seven modes, as named above. The modes retain their numbers/names regardless of key. When you play modes in a key other than C, you have to use the notes that are sharped or flatted in that key. But no mode requires that you sharp or flat any note other than the ones already in the diatonic scale of that key. A mode always has 7 tones (notes).

    There are other kinds of scales, such as various pentatonic, Arabic and Oriental scales, but these may have fewer or more notes than modal scales, or they may contain sharps or flats that do not appear in a diatonic scale. Therefore, not all unusual-sounding scales are modes.

    I’m often asked why some music is called “modal” to distinguish it as being different from the diatonic scale, when the diatonic scale is also a mode (Ionian). Well, in common terminology the term “modal music” is inaccurately used for music in a mode other than diatonic. More accurately, “modal” should mean a scale other than chromatic*.

    Below is a chart to help you see and understand the modes clearly. The top line of the chart shows the position of whole steps and half steps on a piano or harp. You don’t have to do anything special to get the whole steps or half steps; they are inherent in the tuning of the instrument and will automatically occur on the white keys of the piano or the strings of the harp tuned to C.

    Notice that the numbers of the notes go from 1 to 7 and then repeat in the next octave, and that the number 8 is in parentheses because it is also 1 of the next octave. (In other words, in the exercise described above, middle C is 1, and the C an octave higher is 8, but 8 is also the starting note of the next octave, so it is also 1.)

    You can click on the chart to enlarge it.


    *Chromatic: a chromatic scale is a 12-tone scale containing all the sharps, whereas a diatonic scale is 7-tone. You can get a chromatic scale by playing all the keys in one octave of a piano – i.e. C to C including all the black keys. On a harp, start with all your levers down and play the ascending notes from the tonic of whatever you’re tuned to (Eb, Bb or C), raising each lever after you play the natural note so you’re plucking the string twice. (You’ll notice the third and seventh levers will give you the same note as the next position – for now just ignore that. I’ll write about it in a future blog.)


  • Terminology of Tone

    Recently a student asked for a precise definition of “tone”. Since people use the term rather loosely, after defining it for him I decided to consult Webster’s Dictionary and other sources, where I discovered incredibly vague definitions: “quality of sound” doesn’t tell us much. When I looked up the words used in the definitions, I often found “tone” as part of their definitions. That’s like saying a cat is a feline and a feline is a cat.

    In addition to the challenge of defining tone in general, every instrumentalist and every singer has a different idea of what good tone is. That’s as it should be; we all have our preferences. It’s best not to make the mistake of thinking there’s a standard for any instrument or for voice. Yes, Amati and Stradavari may be the gold standards for violins, and there are certain favorites for other instruments, to the degree that if someone didn’t agree they wouldn’t dare say so. But the truth is, “good tone” is what’s good to your ear.

    Furthermore, tone may not only describe the sound inherent in the individual instrument but also the quality of specific sounds a player makes on an instrument. And beyond that, the best tone of an instrument is only brought out by those whose technical skills allow the full tonal potential of an instrument to be audible. (I sometimes tell my students that if they don’t learn to play with good technique they’ll get a $300 sound from a $3000 instrument.) Much more important than the inherent tone of an instrument is how well the player brings out its best tone.

    Interestingly, after years of owning the finest instruments tone-wise, I now have instruments that are suited to the size of my hands and body instead; I find that unless someone purposely compares one instrument to another and judges their tones accordingly, they sound just fine. No one is going to walk up to me and say, “Your little 1890’s guitar doesn’t sound as good as the Martin I heard last week.”

    Let’s look at the word Timbre (pronounced tamber). Wikipedia says: “the quality of a musical note or sound or tone that distinguishes… string instruments, wind instruments, and percussion instruments… In simple terms, timbre is what makes a particular musical sound different from another, even when they have the same pitch and loudness. For instance, it is the difference between a guitar and a piano playing the same note at the same loudness. Experienced musicians are able to distinguish between different instruments based on their varied timbres, even if those instruments are playing notes at the same pitch and loudness.”

    Therefore, don’t confuse the word timbre with the word tone. A guitar sounds like a guitar and a harp like a harp – that’s timbre. How the individual instrument sounds, as in my little 1890’s antique guitar compared to a modern Martin guitar – that’s an assessment of tone.

    Below, I’ve defined very simply the most common terms that pertain specifically to tone. Knowing the common usage of these words can help you communicate better with other musicians.

    • Tone: the quality of an instrument’s or voice’s sound, which is the product of several factors. Some informal descriptions of tonal quality might include:
    o Muddy: the unpleasant effect of clashing notes sounding simultaneously; often heard in instruments with long sustain (notes keep sounding when additional notes are sounded.
    o Tinny: brash, harsh quality of tone.
    o Brash: piercingly sharp, or unfocused (as in too many clashing overtones)
    o Rich: the degree of audibility of pleasing overtones.
    o Bright: exceptional richness, volume and clarity in the mid and upper range of the instrument.
    o Mellow: less bright quality of tone (but not necessarily degree of volume), and perhaps fewer overtones and/or less sustain.
    o Subtle: not overstated.
    o Deep: the degree to which the lowest undertones of each note are discernable, and/or the bass range is pleasingly audible.
    o Round: balanced quality of tone throughout the range of the instrument, from deep to bright.

    • Resonance: (often used interchangeably with tone) the quality of sound vibration in resonating chambers such as the soundboxes of acoustic instruments (or for singers, the mouth, throat, nasal cavities, bronchii and lungs). Also, the tendency of an object to vibrate sympathetically when a similar or identical tone is made by another object (this concept is often used in therapeutic terms referring to physical body responses to musical sounds; a kind of sympathetic vibration in which it is implied that there is also a psychological response; the person “resonates” to the music.)
    • Volume: the degree of loudness or softness.
    • Balance: comparable volume and quality of low, middle, and high ranges of the instrument.
    • Fundamental: the note you hear most obviously when you pluck a string.
    • Overtones: the higher notes that one string produces in addition to the fundamental note when plucked; overtones are not necessarily audible unless you know exactly what you’re listening for. (Not to be confused with sympathetic vibration – see below.)
    • Undertones: same as overtones, but pertaining to notes lower than the fundamental.
    • Harmonics: the purposeful accentuating of a specific overtone by damping the fundamental note of a plucked string so you can hear the overtone. The string is damped lightly in a specific place, at the same time it is plucked. Every string has more than one harmonic (octave, fifth, third, etc.), depending on where you touch the string to damp it.
    • Sympathetic vibration: not to be confused with richness (the audibility of overtones and undertones of one plucked string), sympathetic vibration is the sounding of other strings that are set in motion by the sound waves or the motion of one plucked string or from another source; or the sounding/vibrating of other (unrelated) objects due to the stimulus of sound waves from a primary source.
    • Sustain: how long strings ring after plucking, or how long a singer or wind instrument player holds a note.

    If you’re interested in the phenomena of overtones, undertones, harmonics, and resonance, check out my book Singing the Universe Awake, available from the Books page of my online store at http://www.laurieriley.com